Best practices
To get the most out of Pick-a-Pic, remember these key points as you and your learner begin their functional communication journey.
Communication must be meaningful and motivating.
Functional communication is more than just words — it is also social behavior. Motivation to communicate is a common barrier for individuals with autism that may need to be directly taught.
Start with one picture.
How do you know what is motivating to your learner? They may show motivation by reaching, shifting their gaze, vocalizing, or using an item in a way that is fun or interesting to them. It’s important to choose an item that is actually motivating to them — not something that you think should motivate them.
Here is a real-life example of mine: I once had a learner who was more interested in playing with pipe cleaners than they were in playing with traditional toys. In that case, I had to set aside my assumption that traditional toys would be motivating to them. If I were going to create a Button Book for them in Pick-a-Pic, one of the first buttons I create would have a picture of pipe cleaners.
Start with requests.
Requests establish the value of initiating and maintaining communication. For learners with limited functional communication skills, engaging in tantrums, aggression, or self-injurious behavior may serve as a way to get their needs met. Providing a functional way to communicate needs and have them met can help reduce the harmful behaviors that would otherwise serve that purpose.
Start with photographs.
Photographs, as opposed to icons or illustrations, minimize any barriers related to visual discrimination. This helps draw the connection between a button being tapped and a request being fulfilled.
Establish yourself as a source of reinforcement.
Ensure that the requests indicated by your Pick-a-Pic buttons are things you can quickly fulfill. This establishes the link between the communicative exchange and access to the desired items or activities.
Be specific in your praise.
Provide lots of praise in a style that is motivating for your learner and that is descriptive of their behavior. Instead of saying “Great job!”, you could say “Great job showing me what you want! I love how you looked at the button!”
Make sure your style fits your learner. One learner may be startled if you raise the volume of your voice, while another learner may enjoy clapping and cheering.
Skills to look for and encourage:
- Social approach - body oriented towards you, movement towards you, reaching, eye contact, possibly smiling or laughing or demonstrating enjoyment.
- Increased or purposeful vocalizations - reinforce all attempts at vocal communication (including non-speech sounds) and any attempts at words.
Make small, incremental changes.
Once your learner shows a consistent response, try varying the format in small ways. If you started with a single button on a single page, try adding a second button, and work your way toward multiple buttons on multiple pages. Have your learner try to communicate with a different person or in a different setting.
If you see an increase in challenging or harmful behavior, or your learner is not having success with a change, return to the last format where they had consistent success. Give your learner time to experience success and positive reinforcement before trying another incremental change.
Work toward long-term goals:
The goal of functional communication is to establish consistent social initiation as a foundation for more complex interactions. When your learner has developed the following abilities, they may be ready to graduate from Pick-a-Pic to more advanced AAC apps:
- The ability to make requests for different categories of items, such snacks and toys.
- The ability to use buttons for more than requesting tangible objects, such as using buttons to request activities or to express feelings.
- The ability to make requests in various settings, such as outside, at the grocery store, or with other people.
- The ability to use buttons that require increased visual discrimination, such as buttons that have line drawings or emoji instead of photographs.
Documentation
Pick-a-Pic Documents
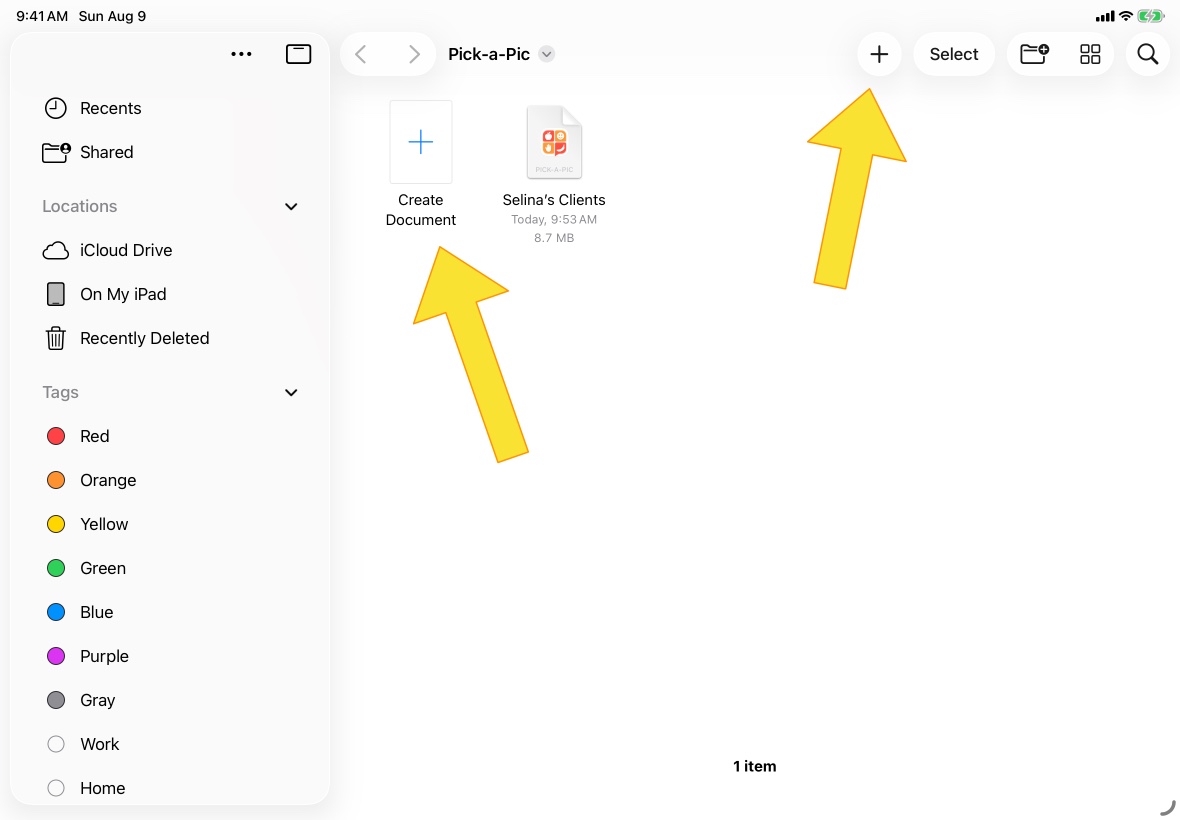
Create or open a document
Your Picture Library and Button Books live in a file known as a Pick-a-Pic document.
The app first opens to the document picker. Tap the Create Document icon or the + button to create a new Pick-a-Pic document. To open an existing document, tap that document's icon.
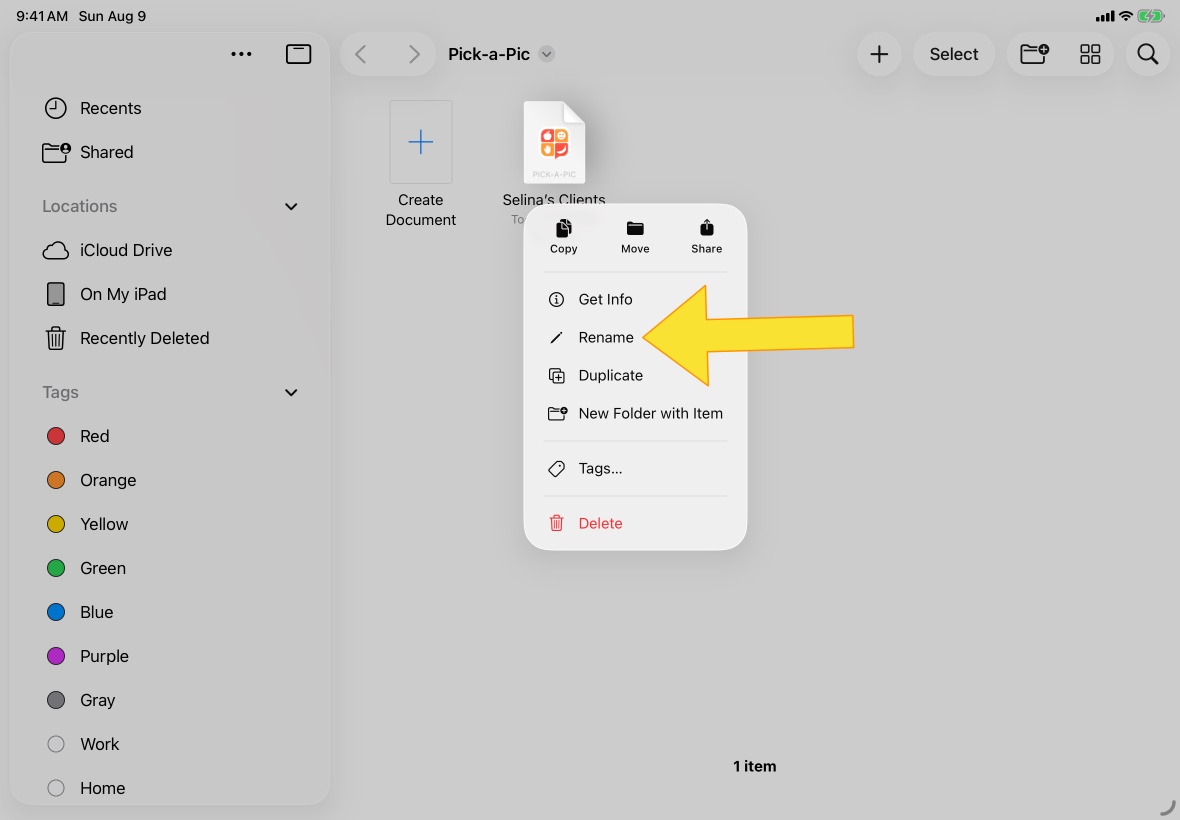
Rename a document
From the document picker, long-press the document's icon until a menu appears. Then tap the Rename item in the menu.
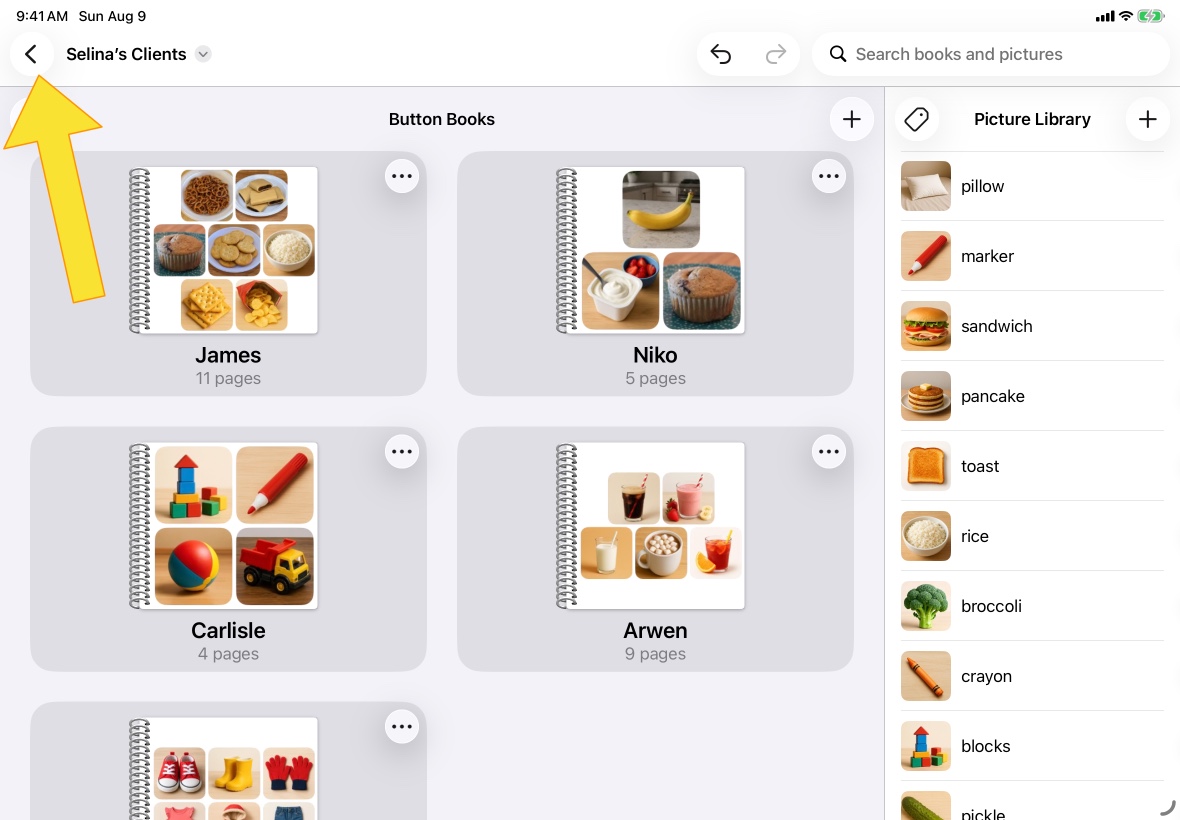
Save and close a document
After you've opened your document, it will auto-save as you make changes.
Tap the ❮ button to close your document and return to the document picker.
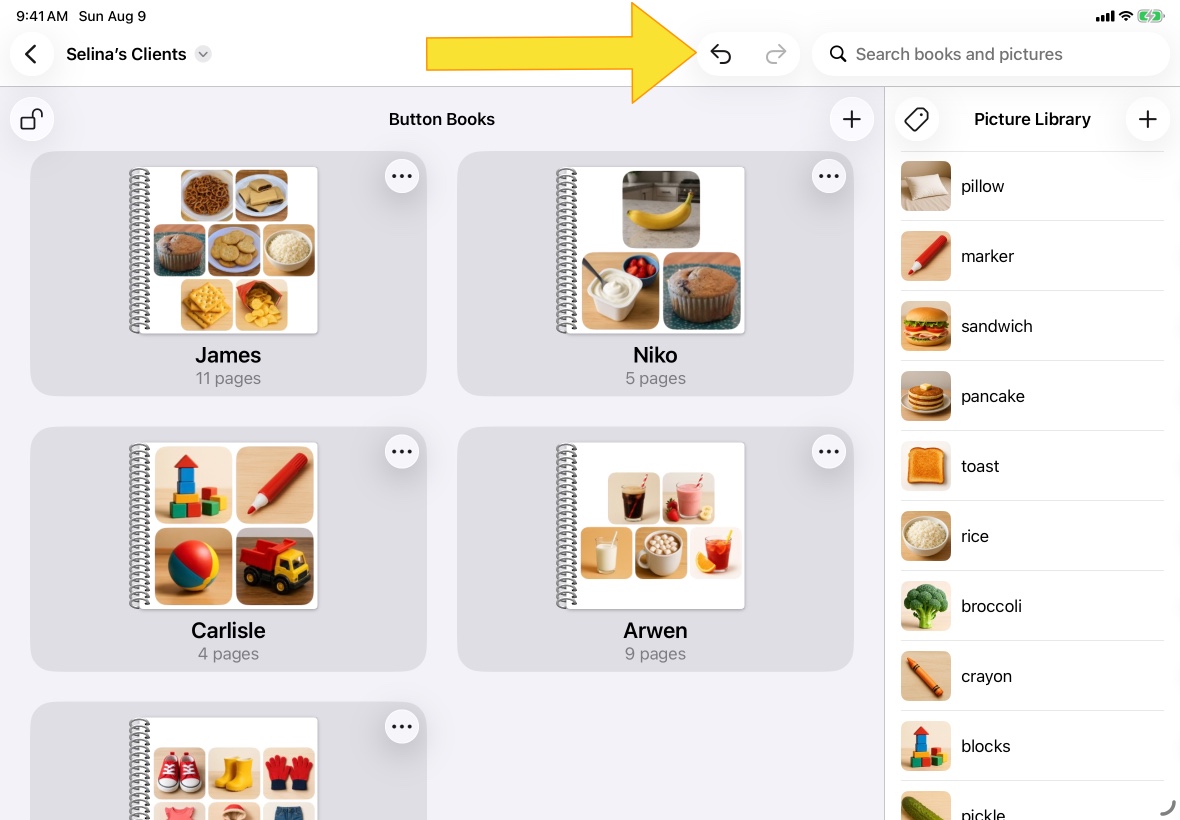
Undo or redo changes
To undo a change you've made to your document, tap the ↺ button. To redo a change that you've undone, tap the ↻ button.
The buttons will be disabled if there are no changes to undo or redo.
Sort books and pictures
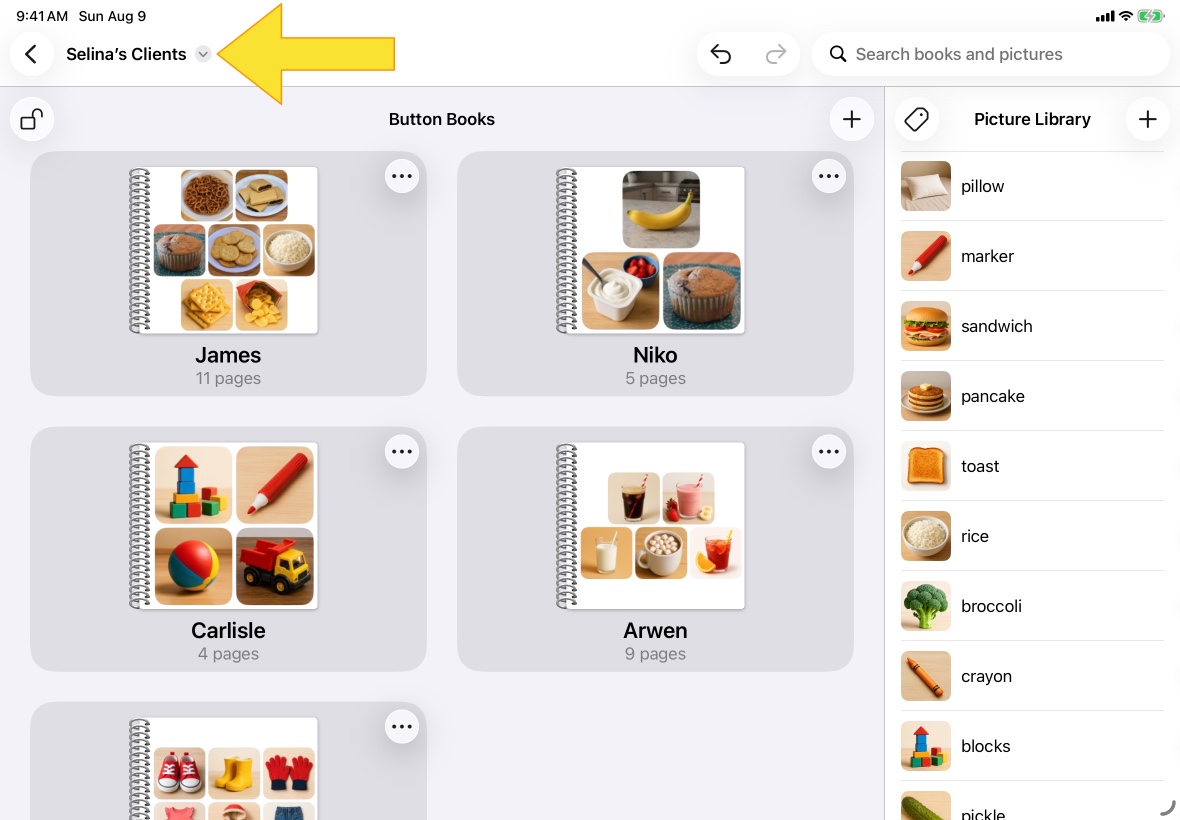
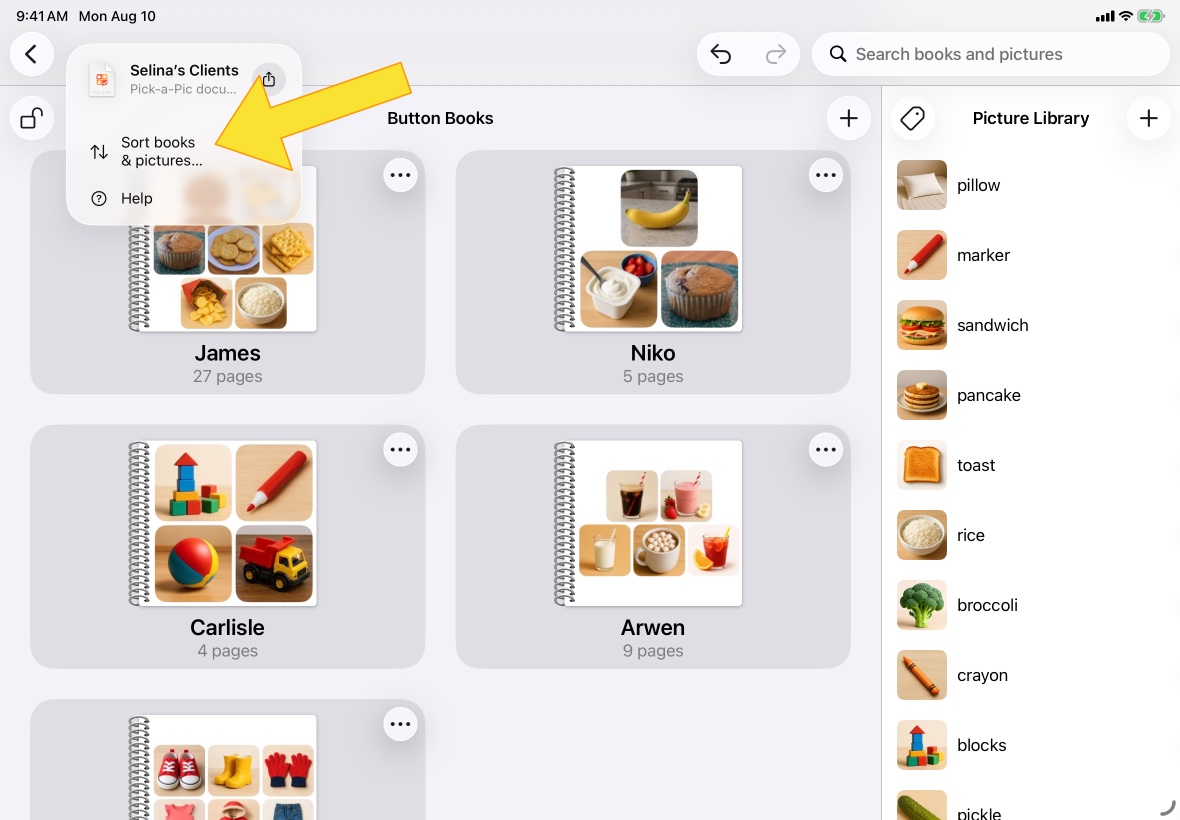
Tap the name of your document and then tap the Sort books and pictures... item of the menu. A submenu will open that allows you to choose the order that your Picture Library and Button Books are sorted.
Search books and pictures
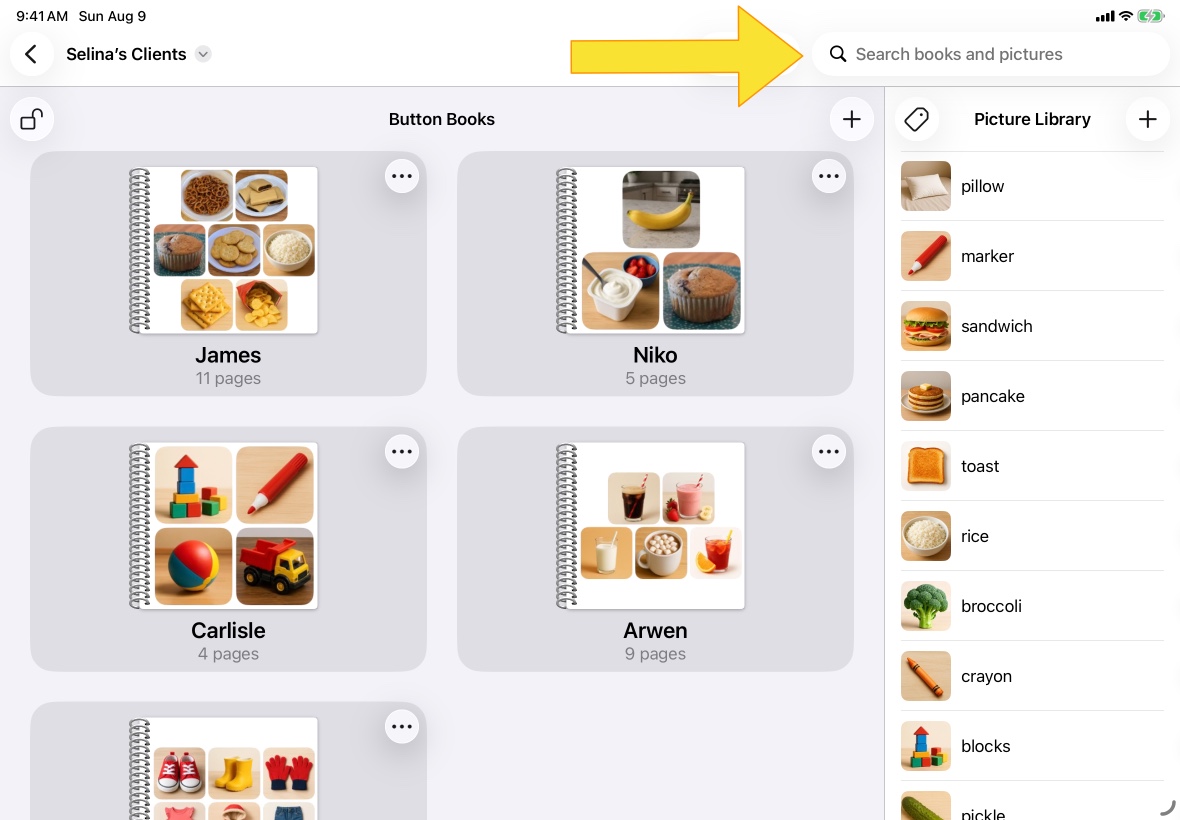
Enter text into the search bar to filter your Picture Library and Button Books. Only pictures and books whose titles match your search text will be shown.
Tap the ✕ button in the search field to clear the text and show all of your pictures and books.
Picture Library
Add a picture
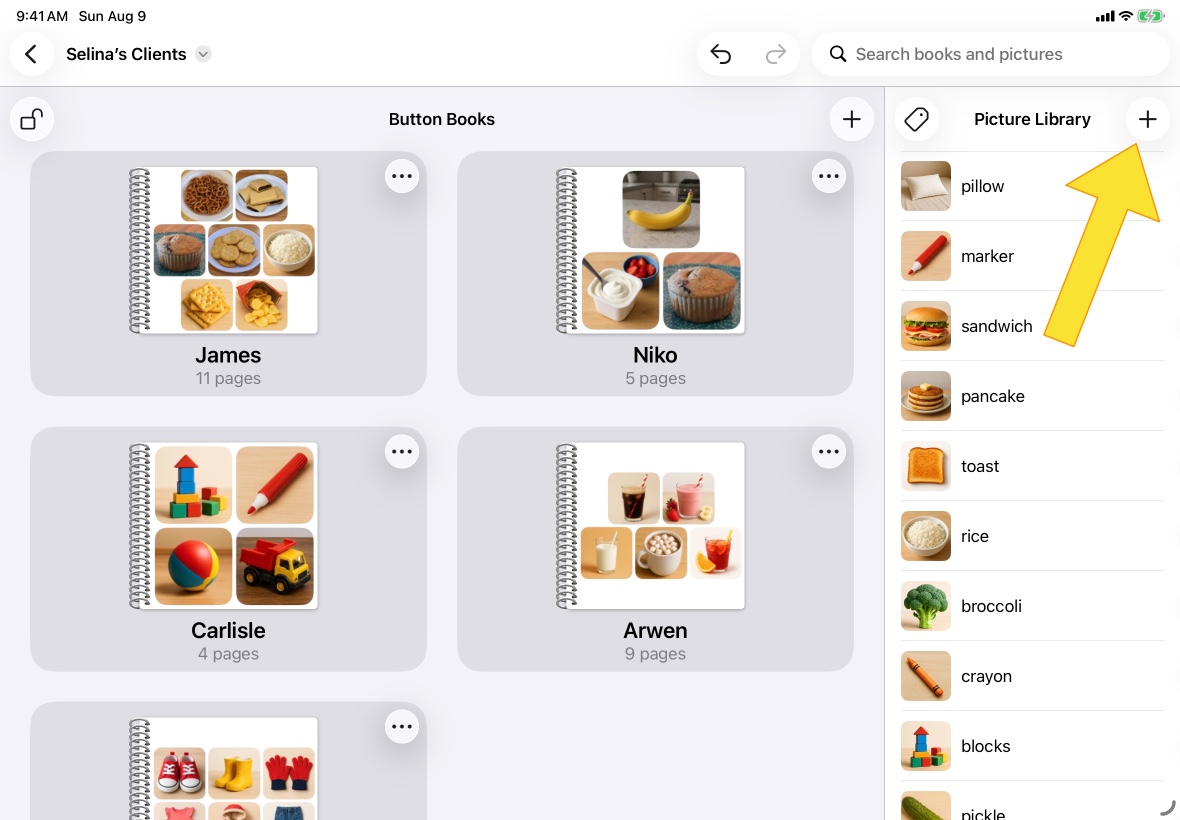
Tap the + button at the top of your Picture Library to create a new picture. Then select how you would like to create your picture.
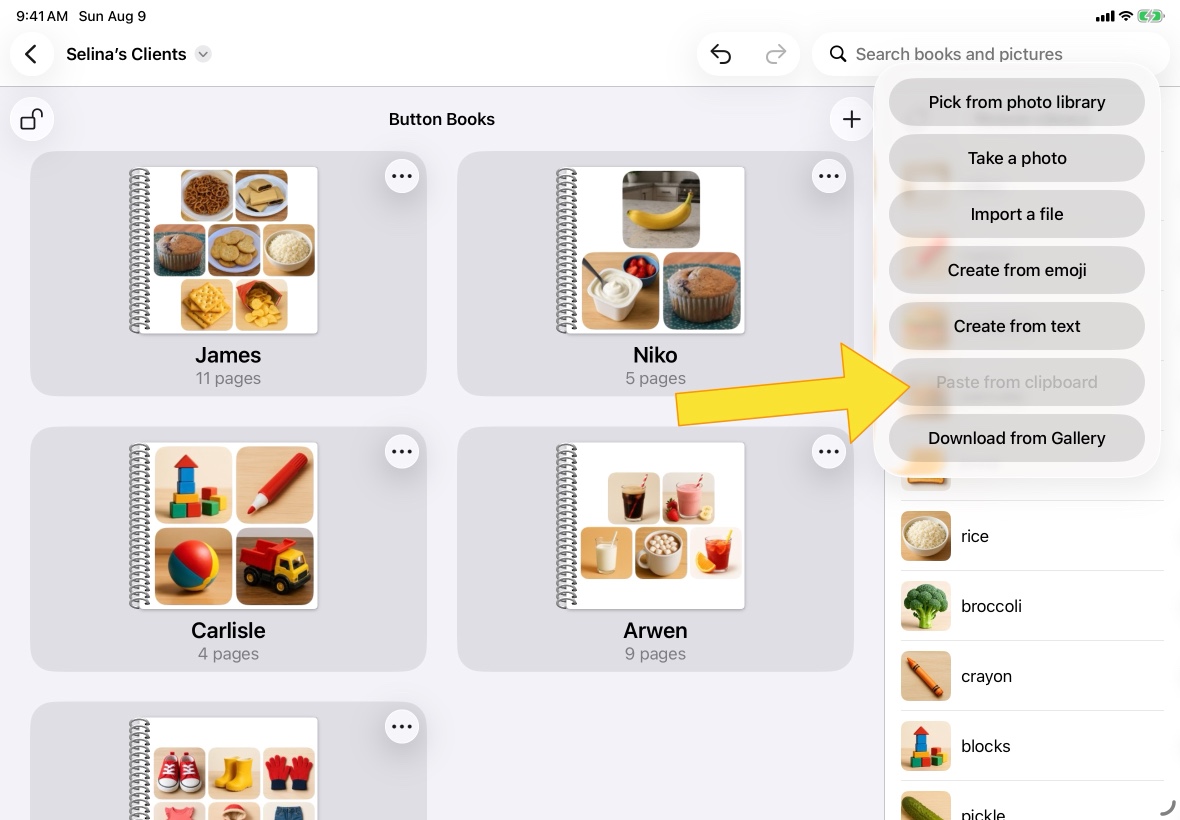
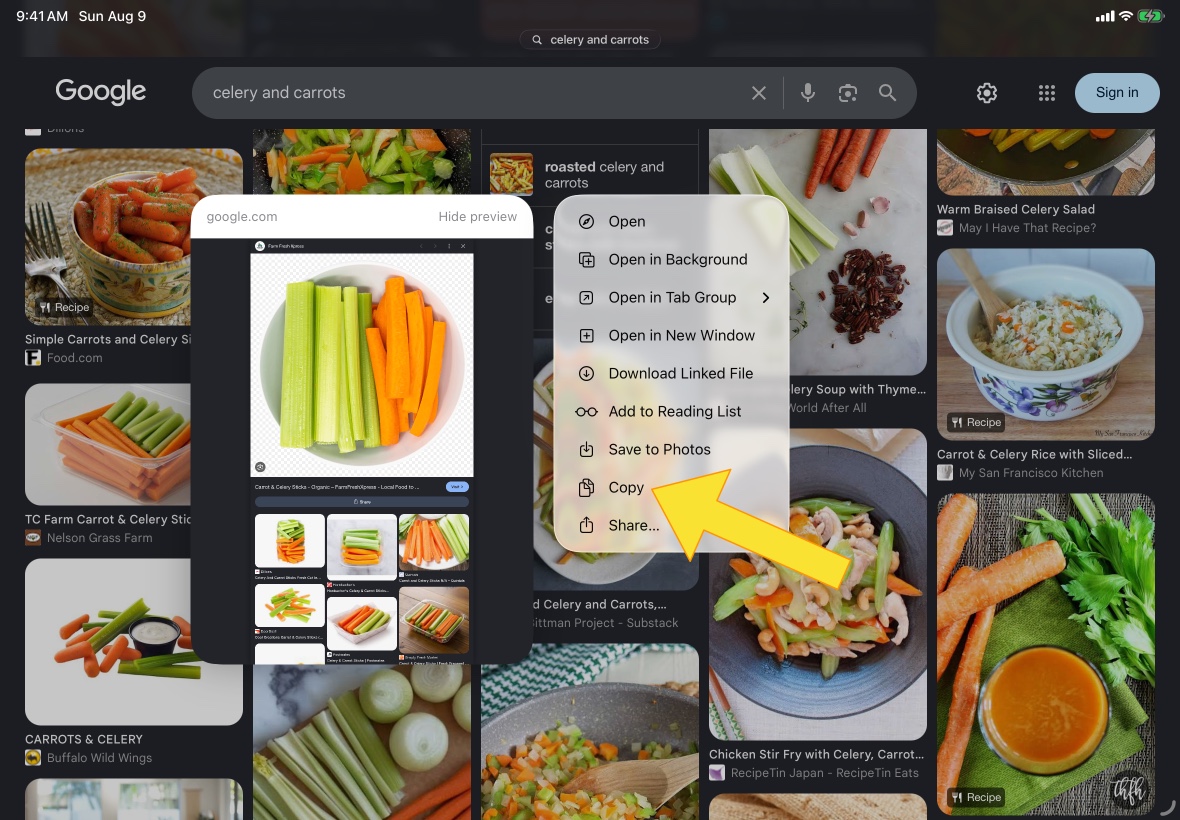
Paste from clipboard
If your device's copy-paste clipboard contains an image, this menu item will be enabled.
After tapping the menu item, you will be prompted to allow the paste operation.
Images can be copied from many sources. For example, an image can be copied from the web by long-pressing the image and selecting Copy from the menu.
Crop picture
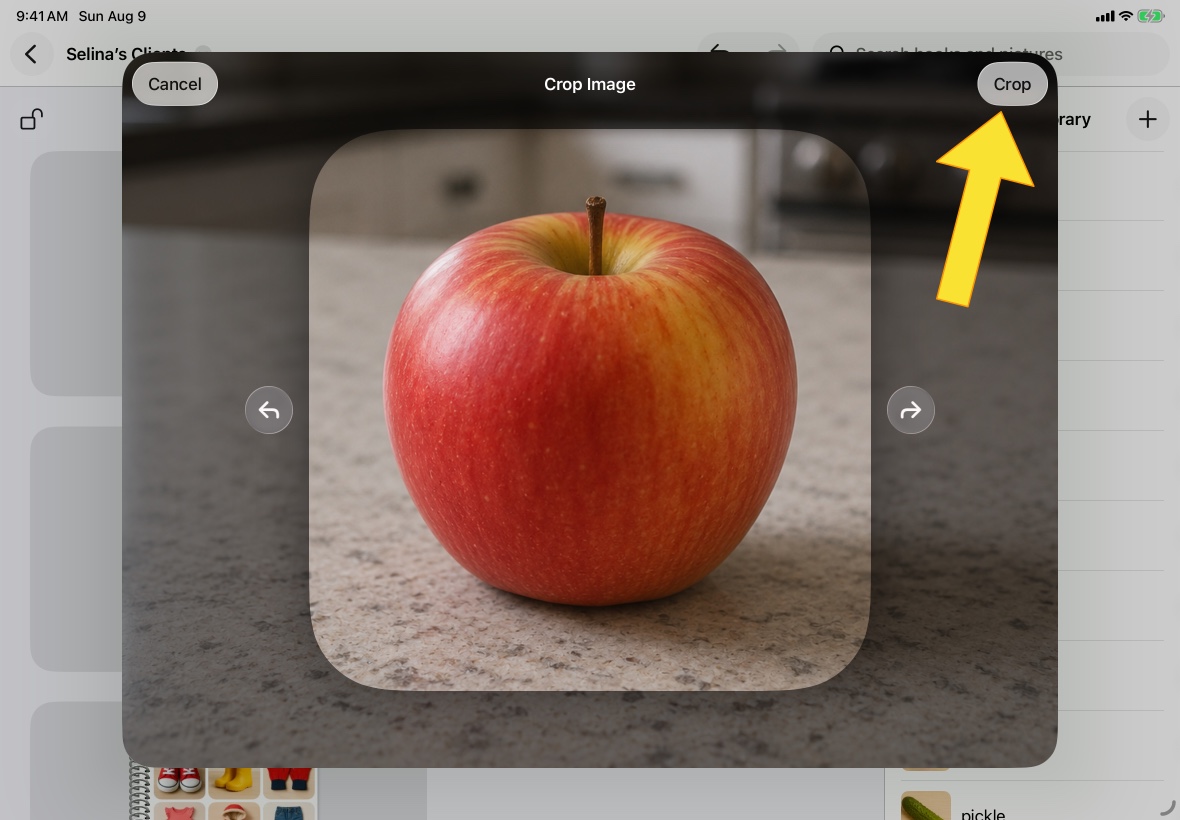
After adding a picture from the photo library, camera, file browser, or copy-paste, you will be prompted to crop the image.
Pinch and drag the image with two fingers to zoom and move it. Tap the buttons on either side of the crop boundary to rotate the image 90 degrees.
Tap the Crop button to crop the image and add it to your Picture Library.
Rename, delete, or tag a picture
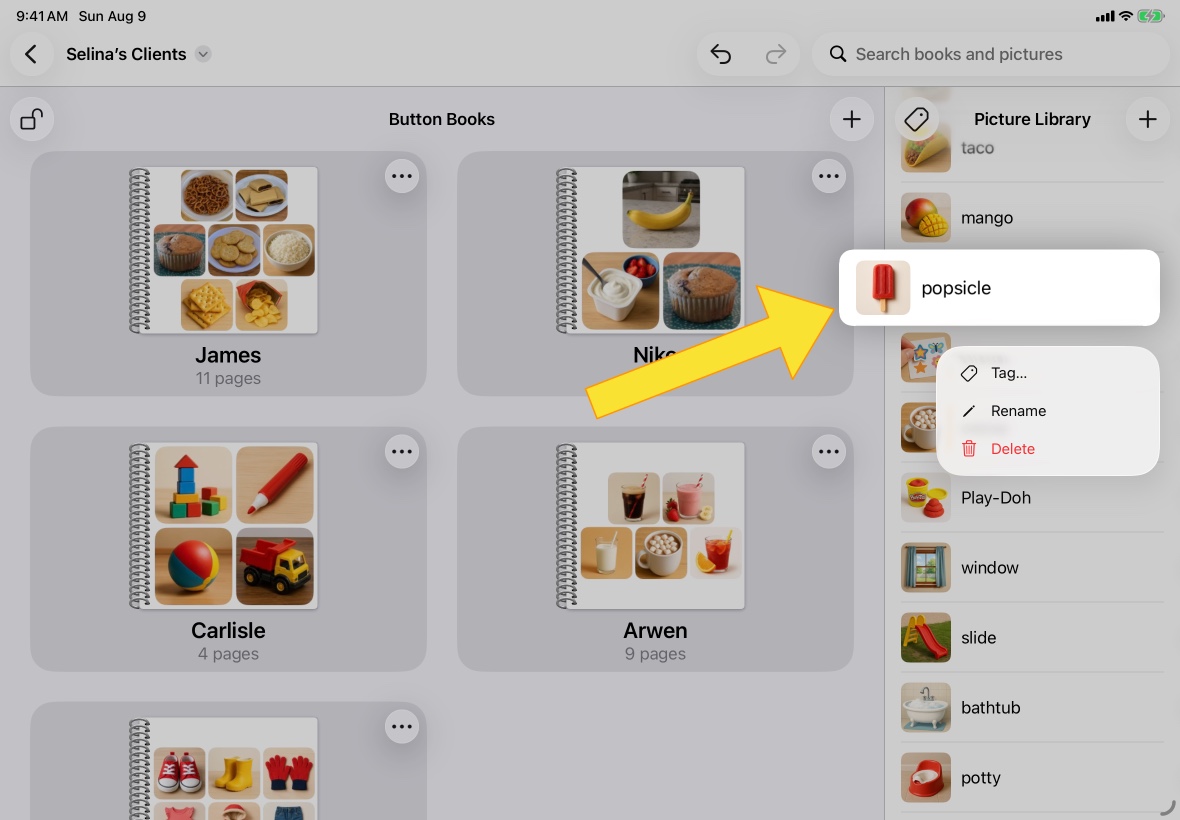
Long-press a picture in your Picture Library and select the corresponding item from the menu.
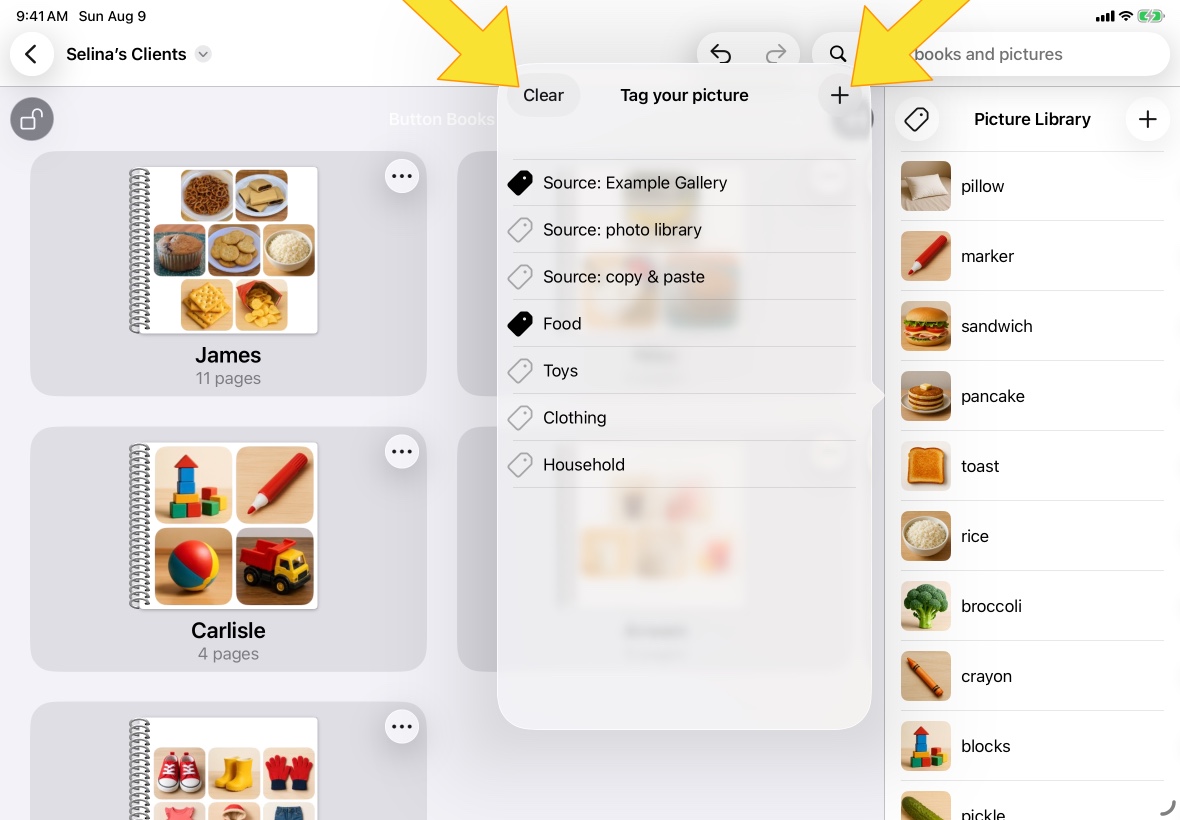
Tag a picture
Tap the Tag... menu item to reveal the Tag your picture menu.
From that menu, tap any tag to apply it to the image.
Tap the Clear button to remove all tags from the picture. Tap the + button to create a new tag.
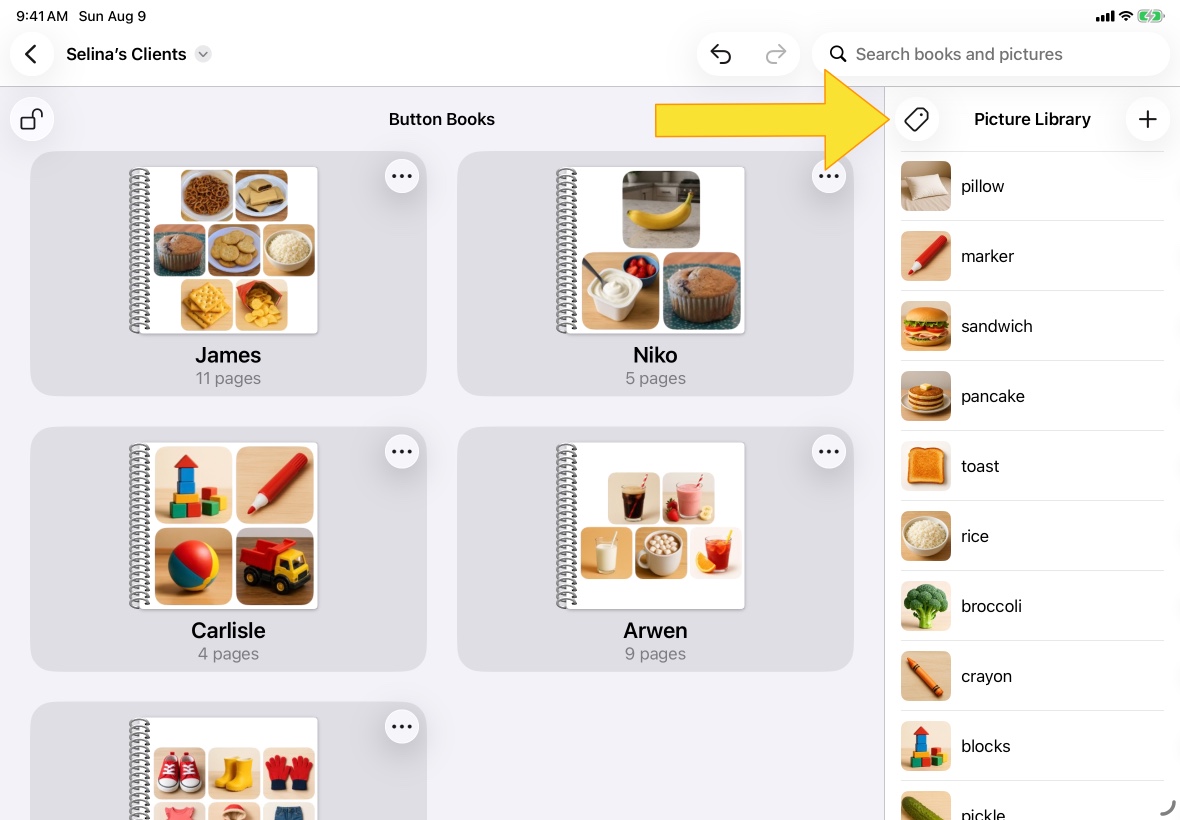
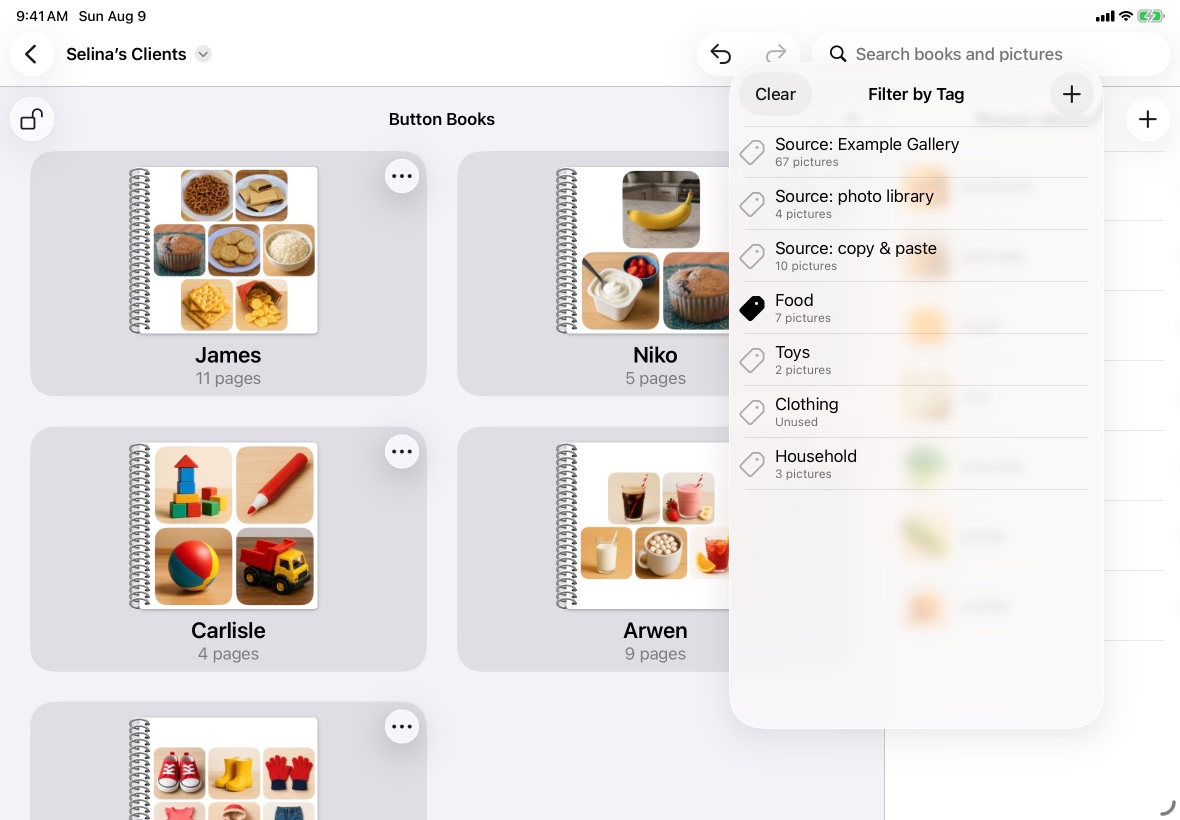
Filter pictures by tag
Tap the tag icon at the top left of the Picture Library to open the Filter by Tag menu.
The icon is an outline if no tags are currently selected. It is filled if your Picture Library is being filtered by one or more selected tags.
From the menu, tap any tag to select it. Selected tags have a filled icon and a checkmark. Your Picture Library will only show pictures that have one or more of the selected tags.
Tap the Clear button to deselect all tags. Tap the + button to create a new tag.
Some tags are created automatically and applied to pictures based on how the picture was created.
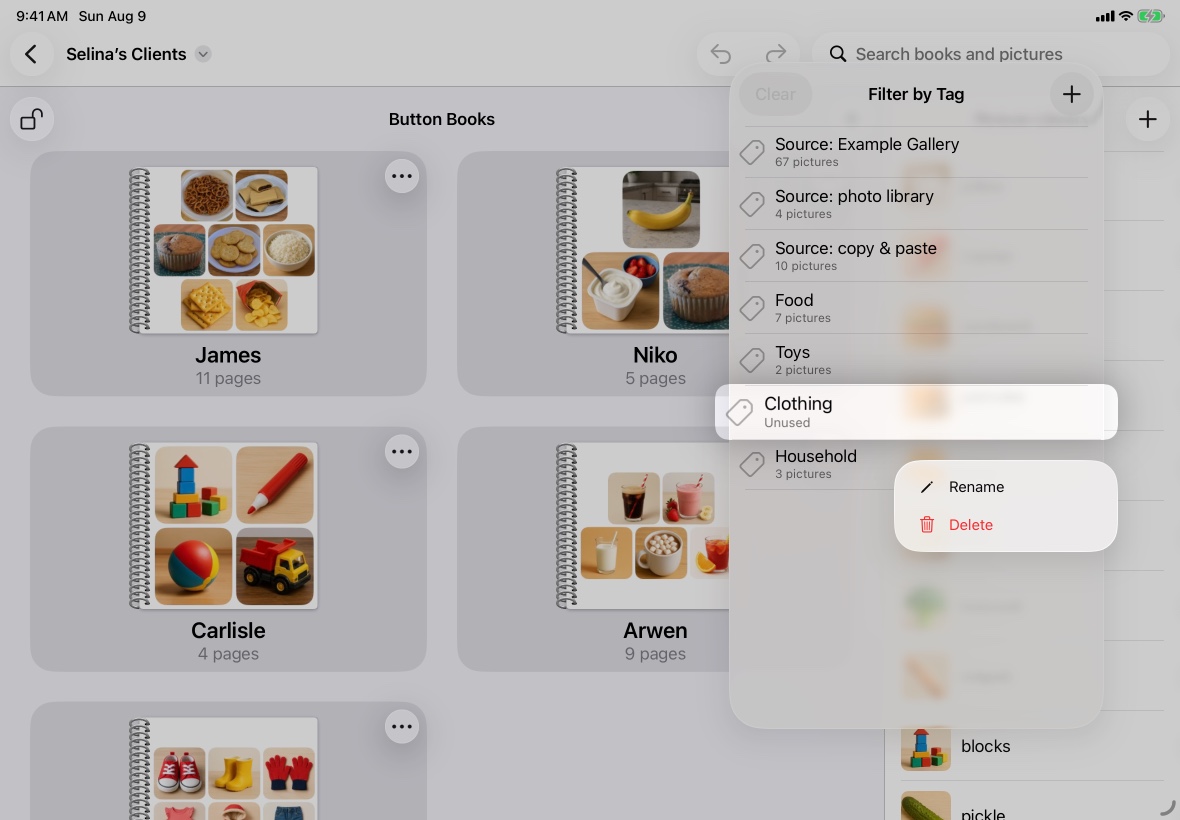
Rename or delete a tag
Long-press a tag to reveal a menu. Then select the appropriate item from that menu.
Button Books
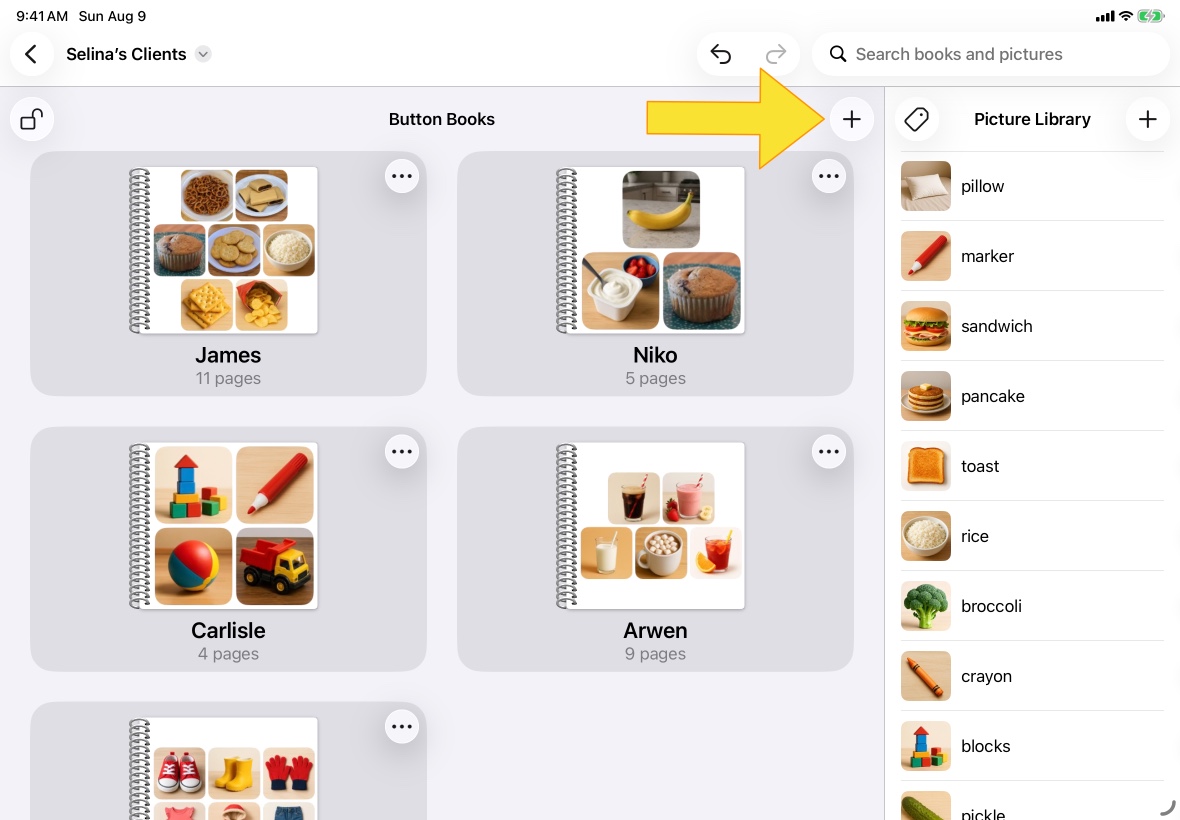
Add a Button Book
Tap the + button on the top right of the Button Books list to create a new book. Then you will be prompted to name your book.
After your book is created, you'll be taken to the edit screen.
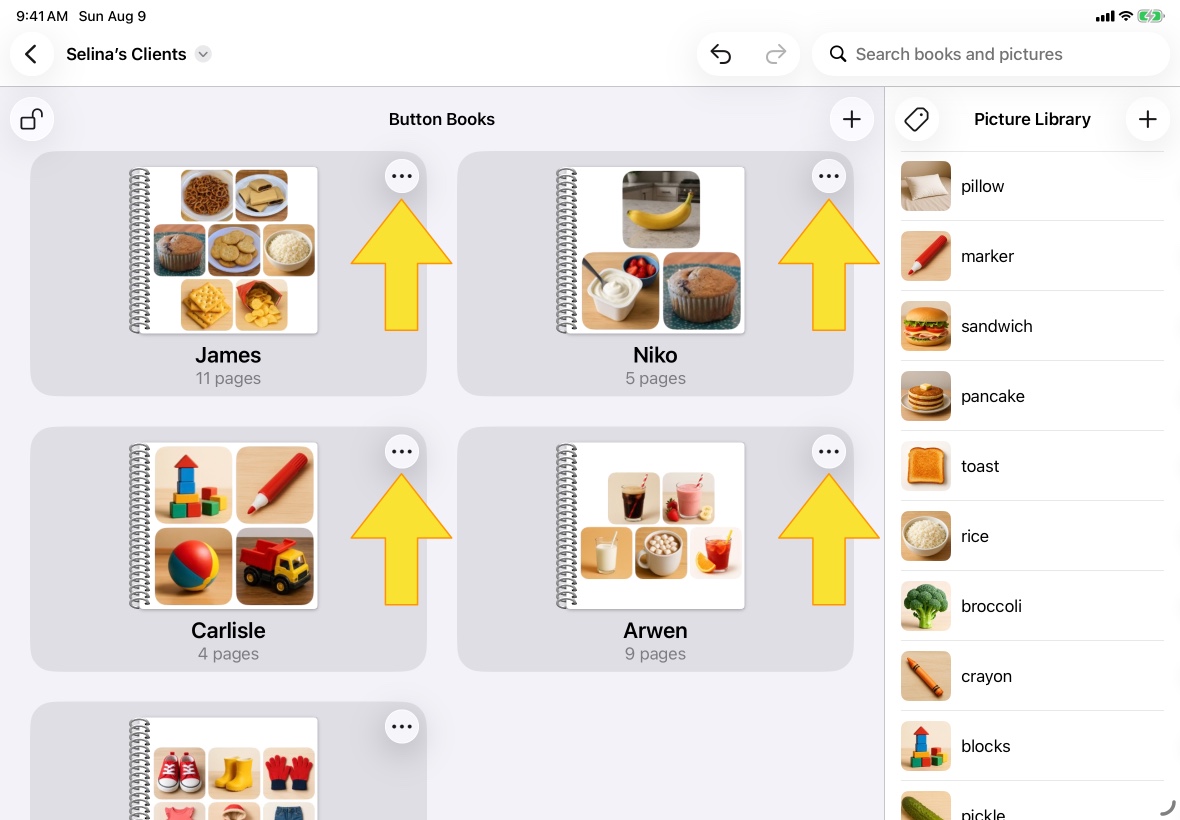
Edit a Button Book
Tap the ⋯ icon at the top right corner of any Button Book to open the book in editing mode.
See the 'Edit a Button Book' section below.
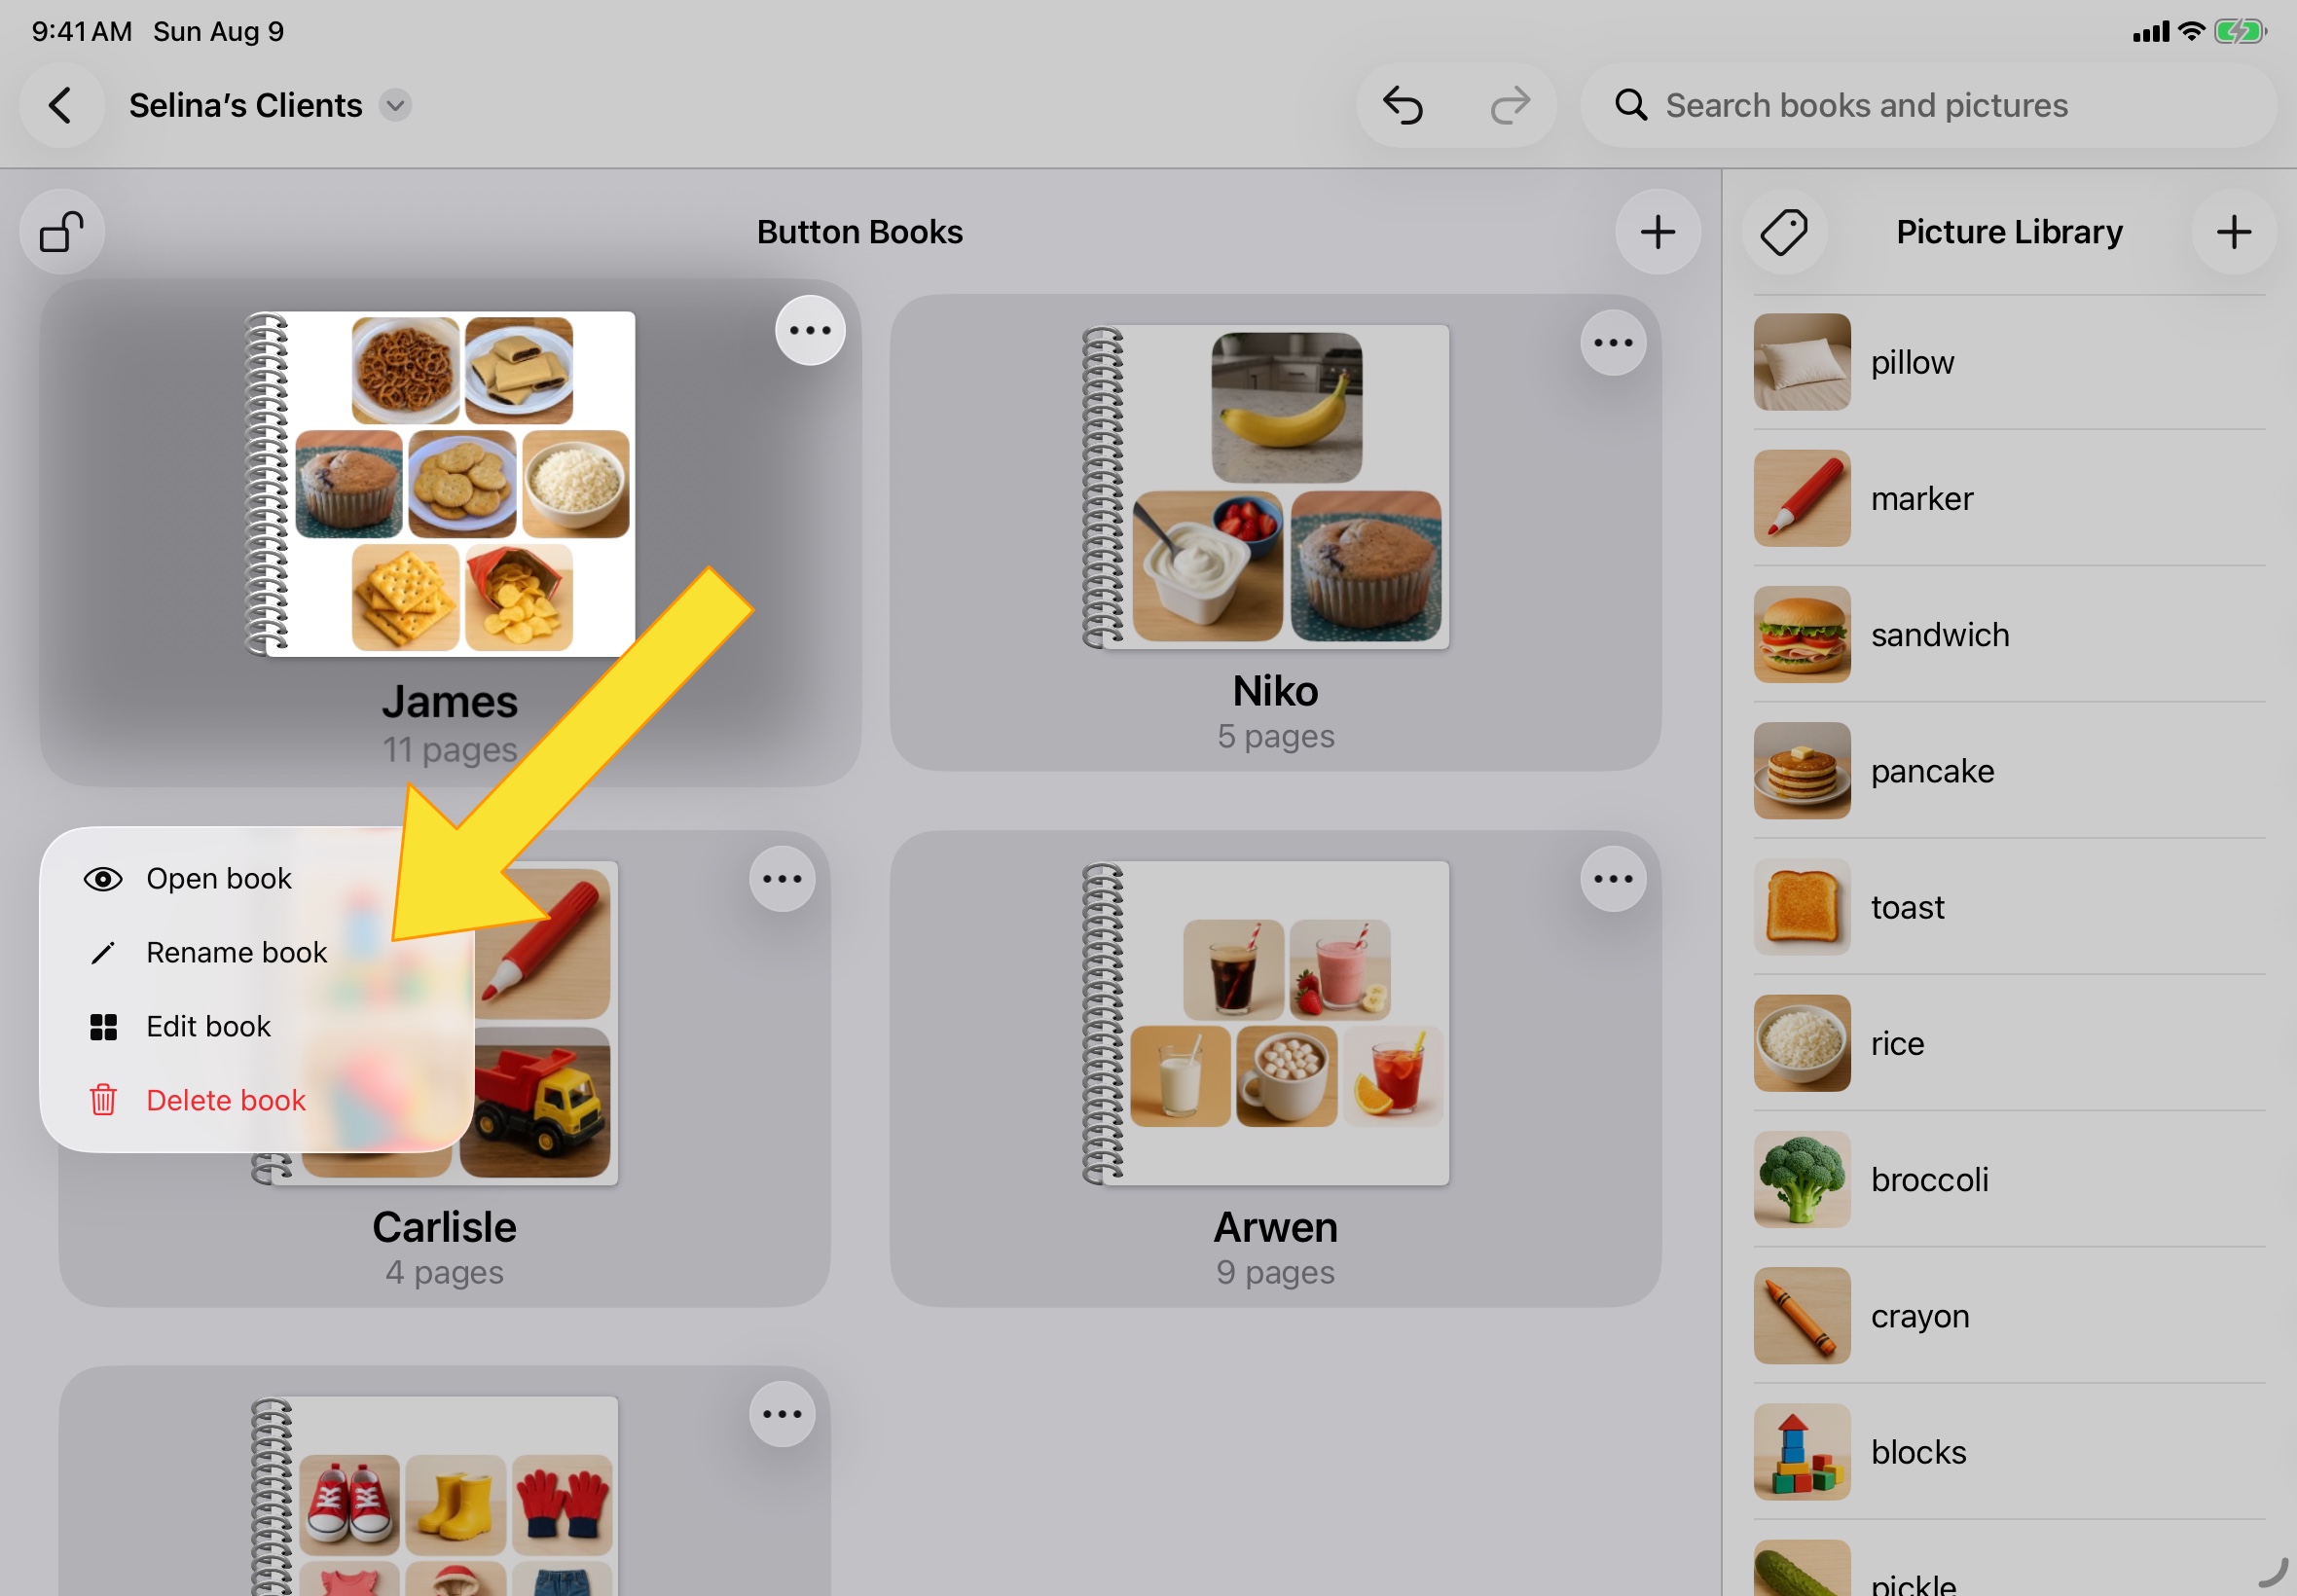
Rename or delete a Button Book
Long-press a Button Book and then select the appropriate menu item.
View a Button Book
Tap anywhere on a Button Book except the edit icon to open the book in viewing mode.
While in viewing mode, any button can be tapped to speak its title.
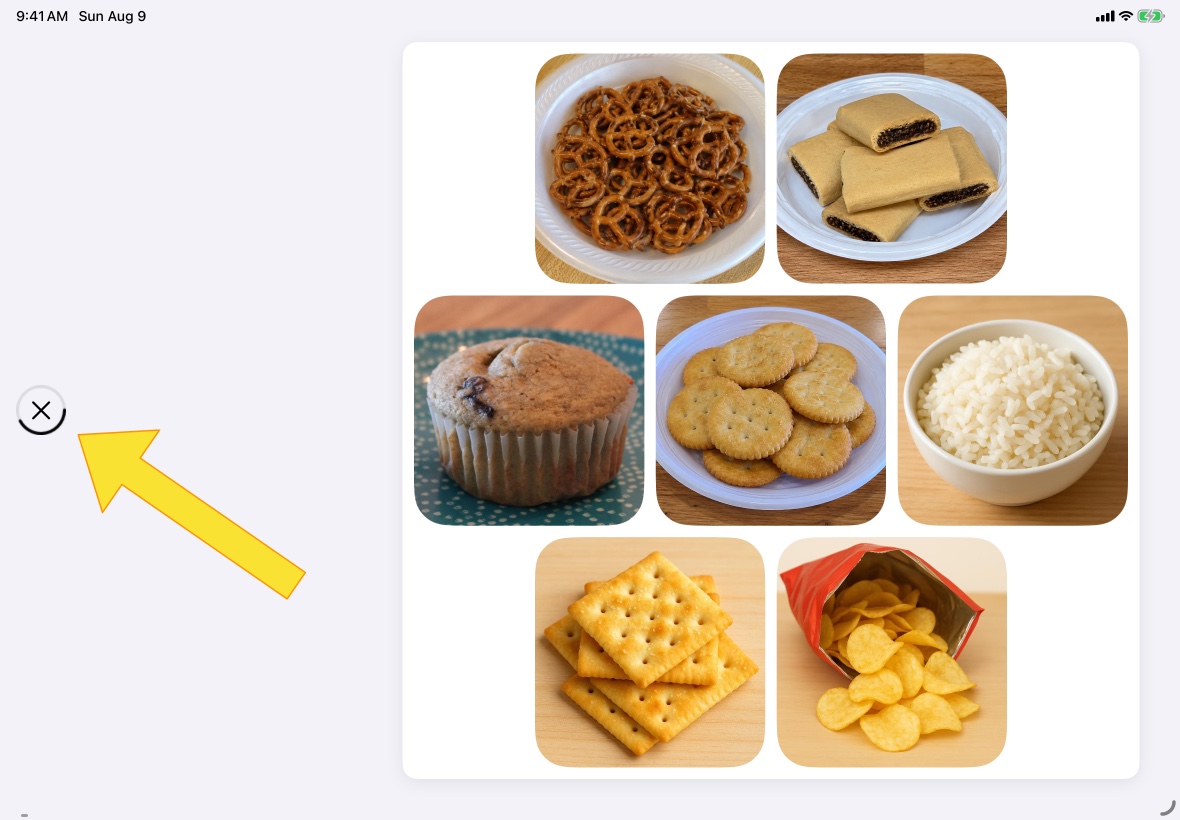
Exit from a Button Book
While a Button Book is open in viewing mode, no header or back button is visible.
To exit from the book, return to the first page and then drag to the right until an ✕ icon in a circle appears.
Hold until the meter is filled to exit the book.
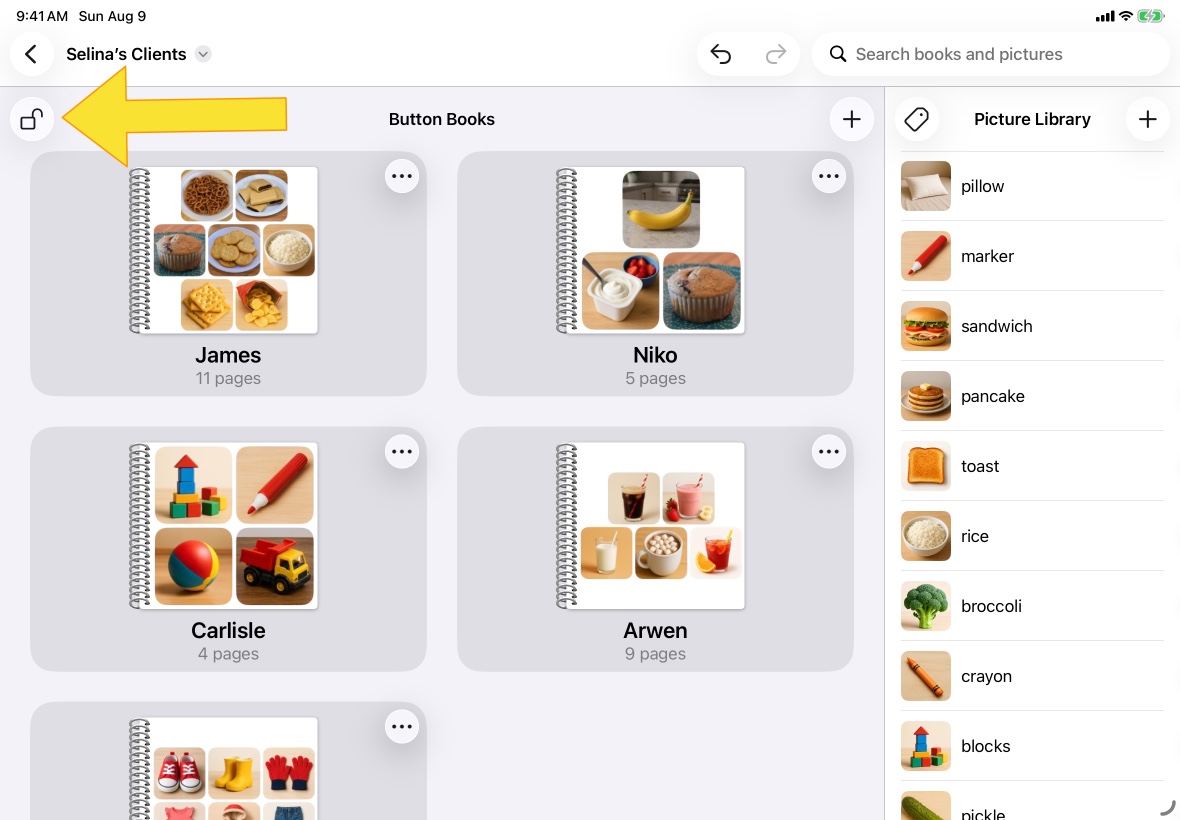
Lock Button Books
The lock settings applies to every Button Book in your Pick-a-Pic document.
To open the Lock Settings menu, tap the lock button at the top left of the Button Books list.
You may lock books with either Face ID or Touch ID (depending on your device) or a 4-digit passcode.
Tap the switch next to the setting that you wish to apply. If both switches are off then books are unlocked.
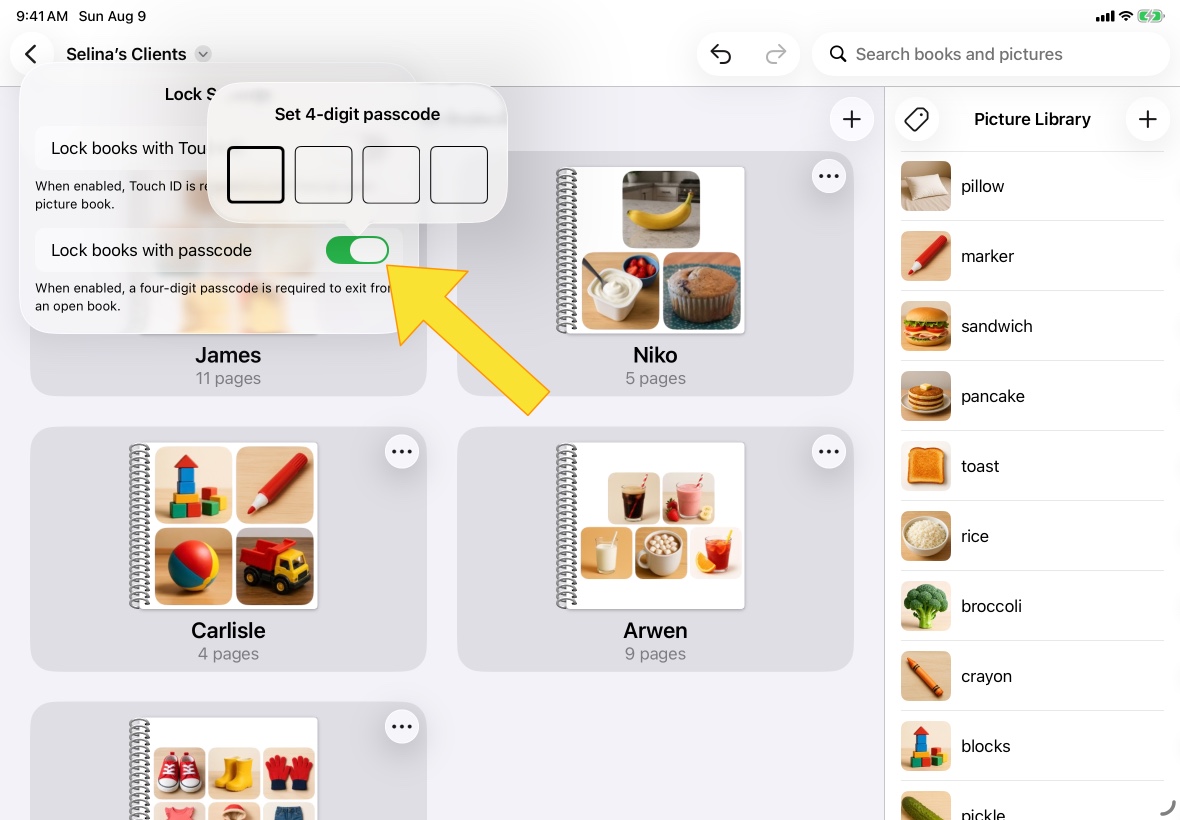
Lock with 4-digit passcode
When you select Lock books with passcode, you will be prompted to enter a 4-digit passcode.
After you enter your passcode, the label next to the switch will display the passcode you entered.
Keep Pick-a-Pic on-screen
You can use your iPad as a dedicated Pick-a-Pic device by setting up Guided Access on your iPad. Combine this with Lock Settings to force a single Button Book to remain on-screen.
Editing a Button Book
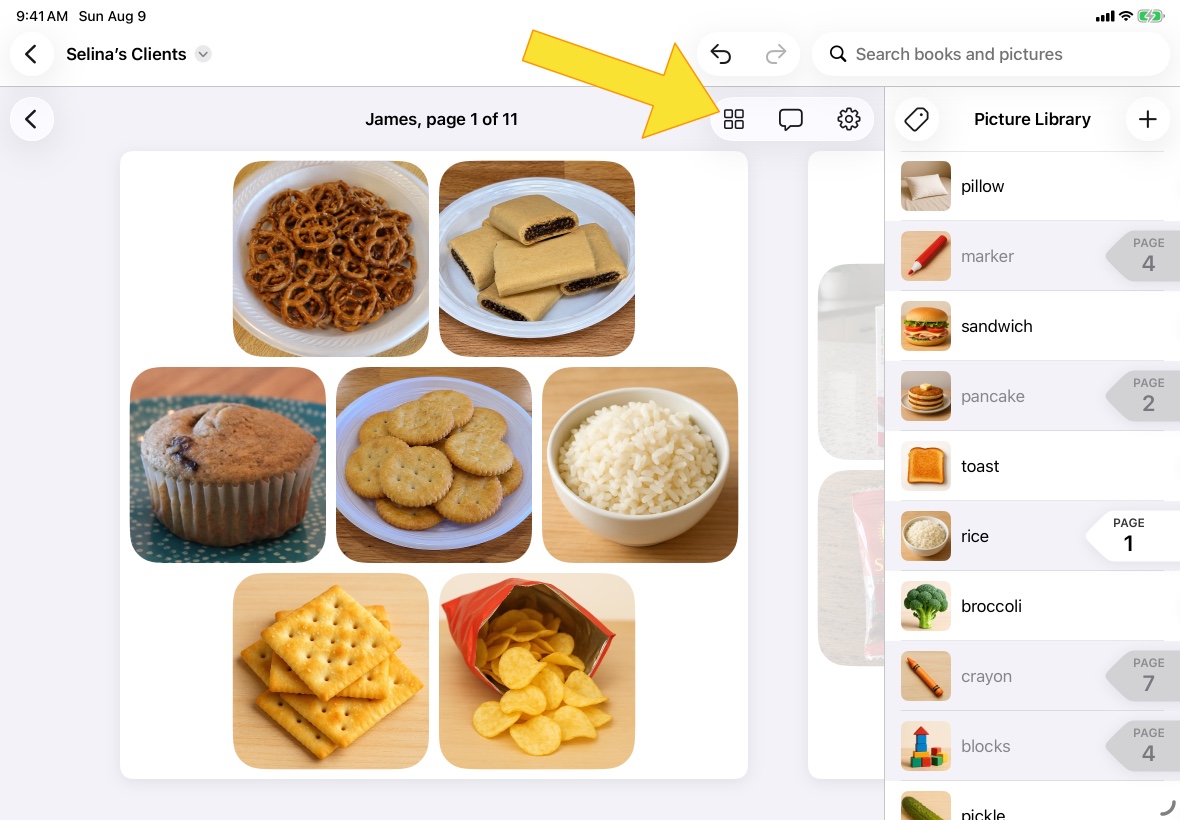
View all pages
The editing screen starts in single-page view, where you can add, move, or remove buttons from pages of your Button Book. Swipe horizontally to go to the previous or next page.
Tap the grid button to toggle between viewing a single page and viewing all pages.
From the all-pages view, tap any page to navigate to it in single-page view.
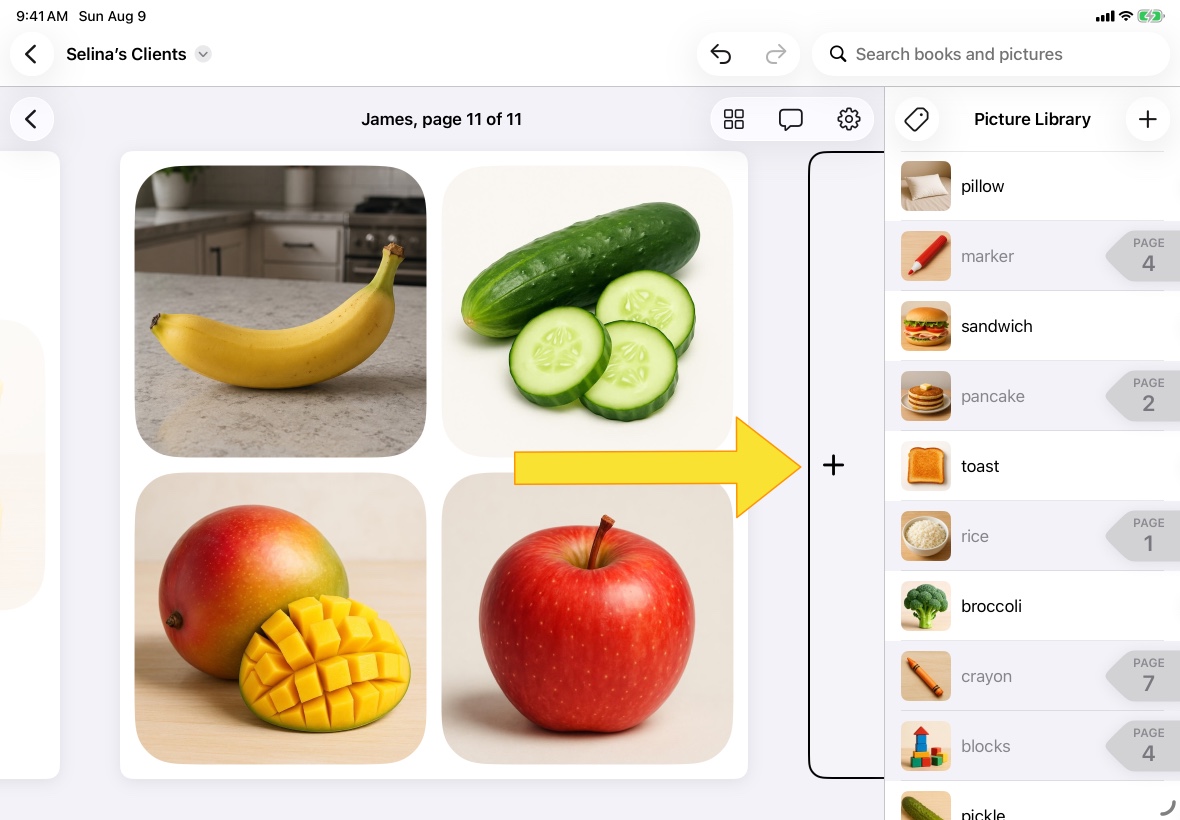
Add a page to a Button Book
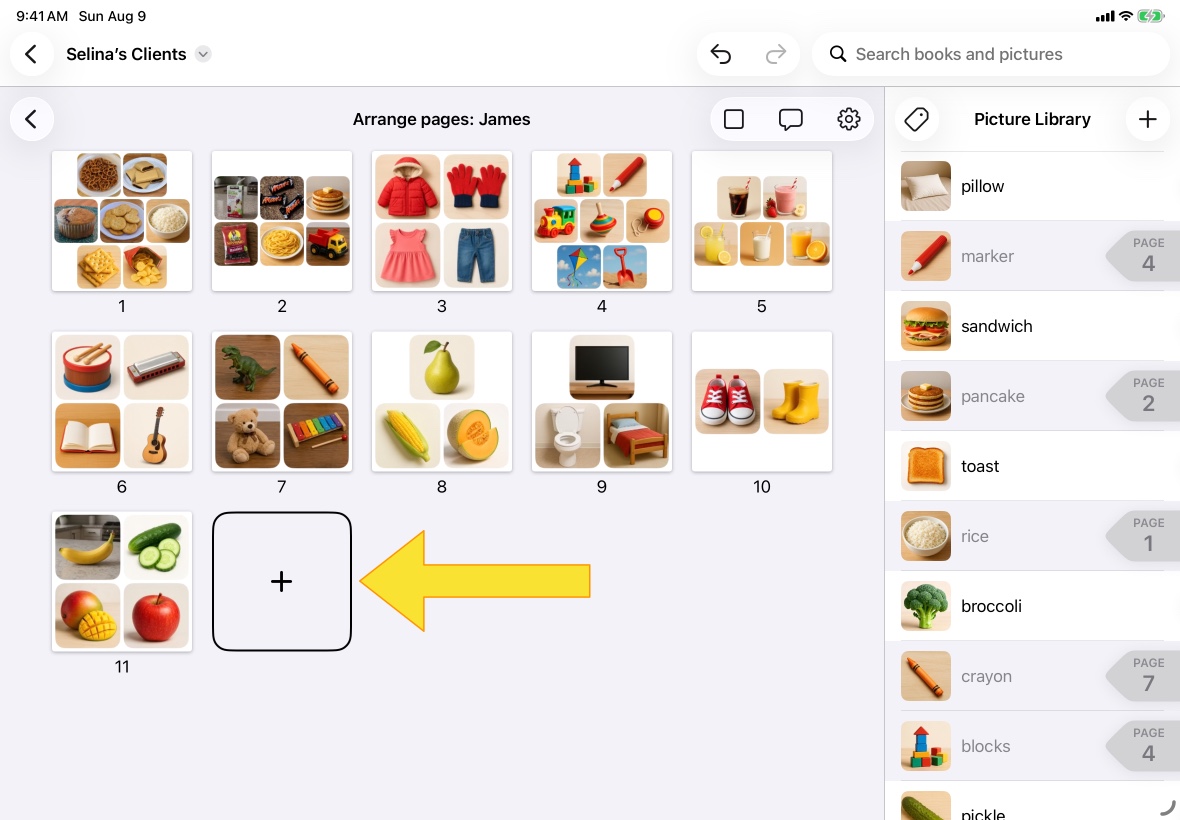
From either the single-page or all-pages view, tap the + button that appears after the last page of the book.
Remove a page from a Button Book
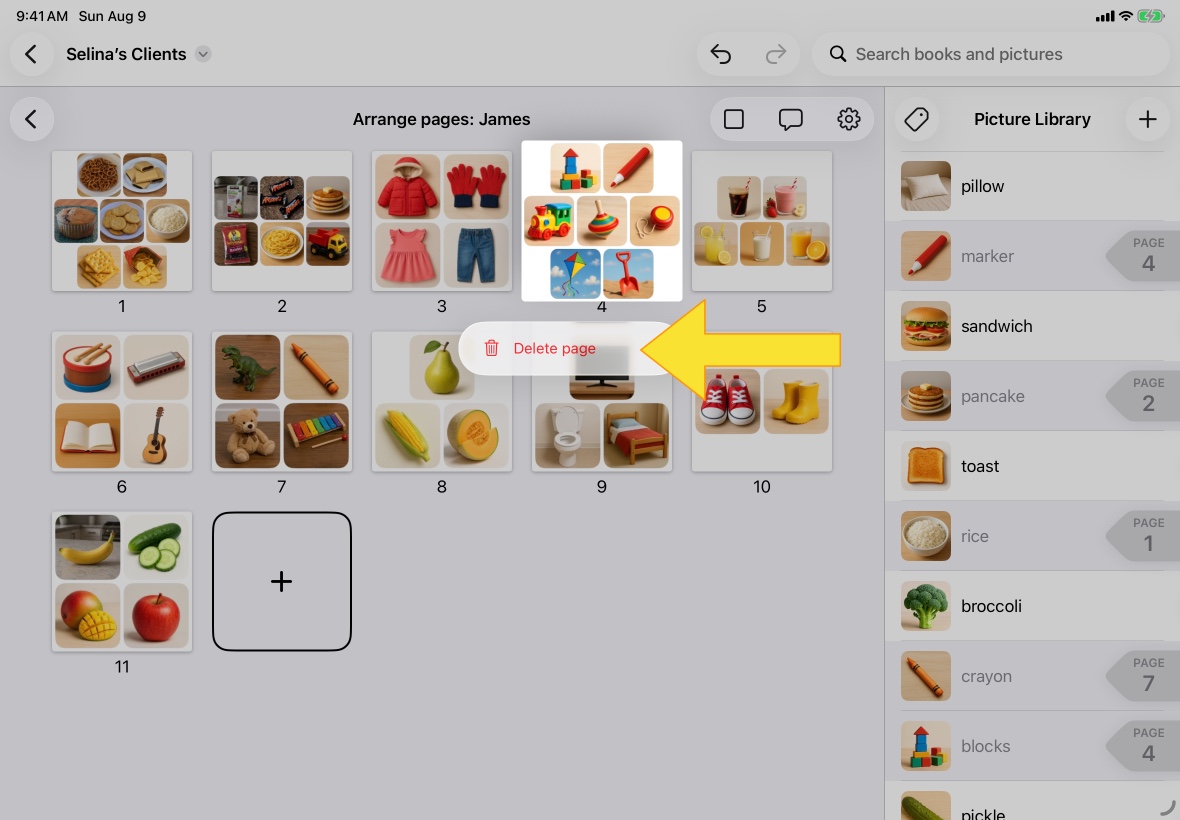
while in the all-pages view, long-press a page and then tap Delete page on the menu
Arrange the pages in a Button Book
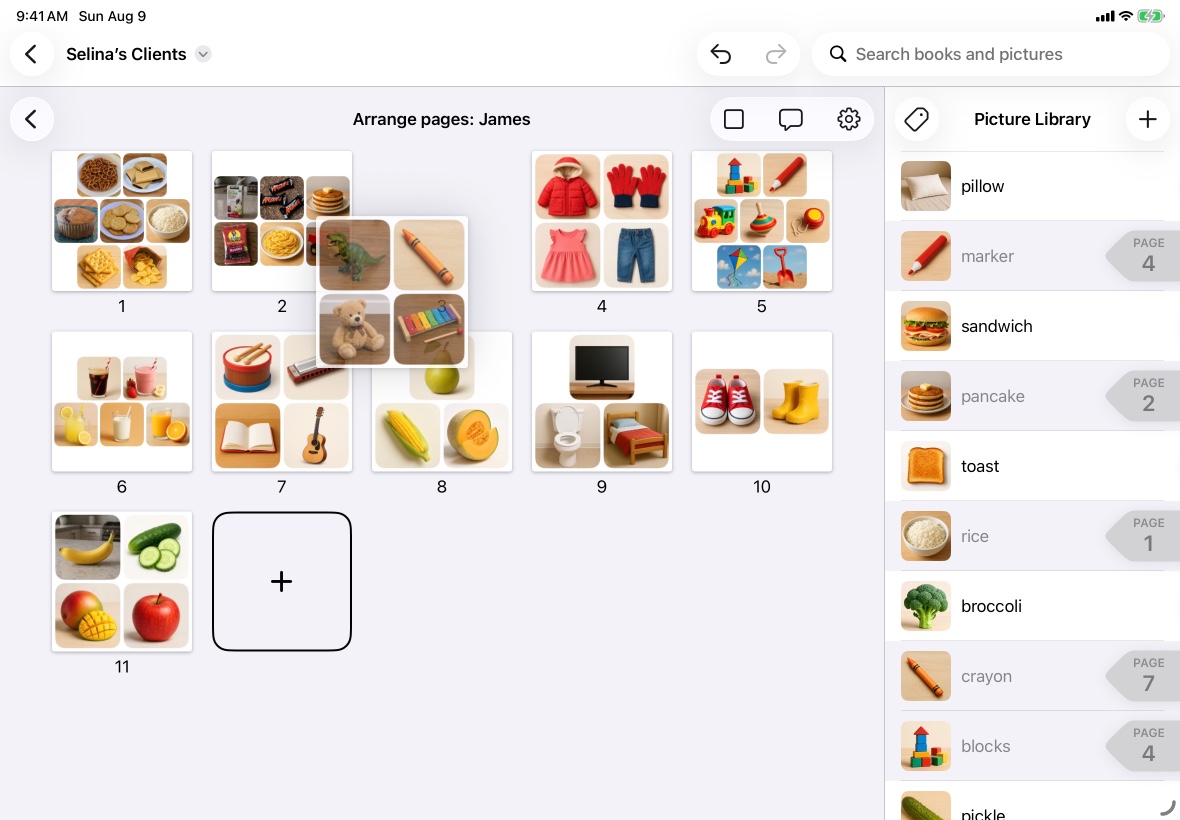
While in the all-pages view, long-press a page and then drag it to change its placement in your Button Book.
Add a button to a page
While in the single-page view, tap a picture in your Picture Library to create a button on the current page. No need to drag-and-drop!
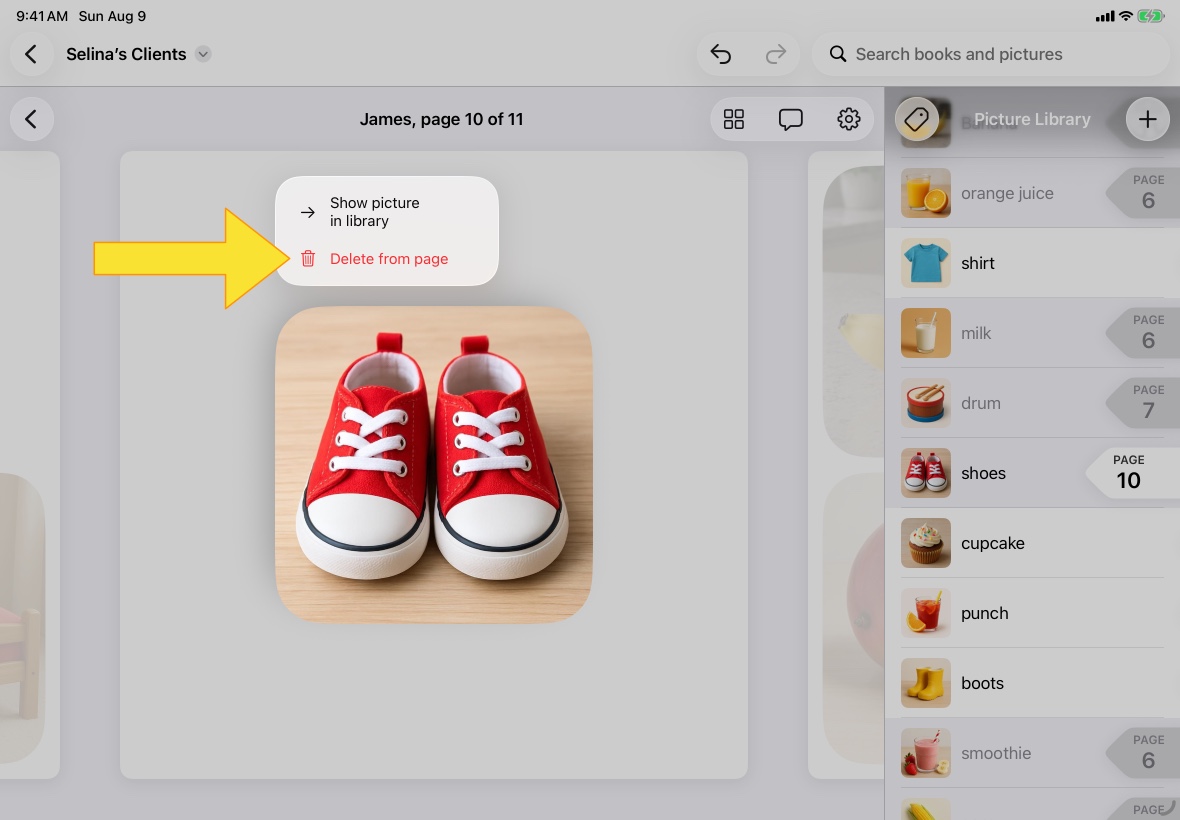
Remove a button from a page
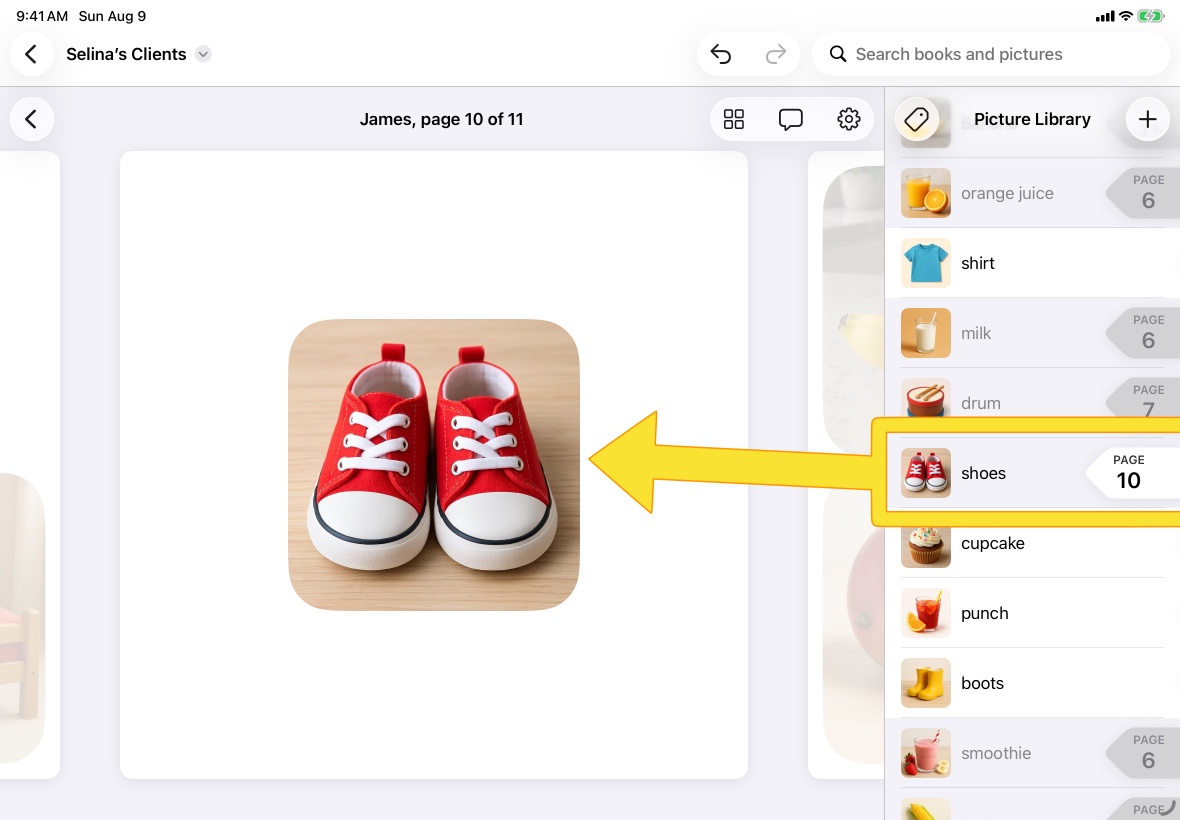
While in the single-page view, if you tap the picture in your Picture Library of a button that is on the current page, that button will be removed from the page.
If you tap a picture that has already been added to a different page, the single-page view will scroll to that page.
You may also long-press a button and delete it from the menu that appears.
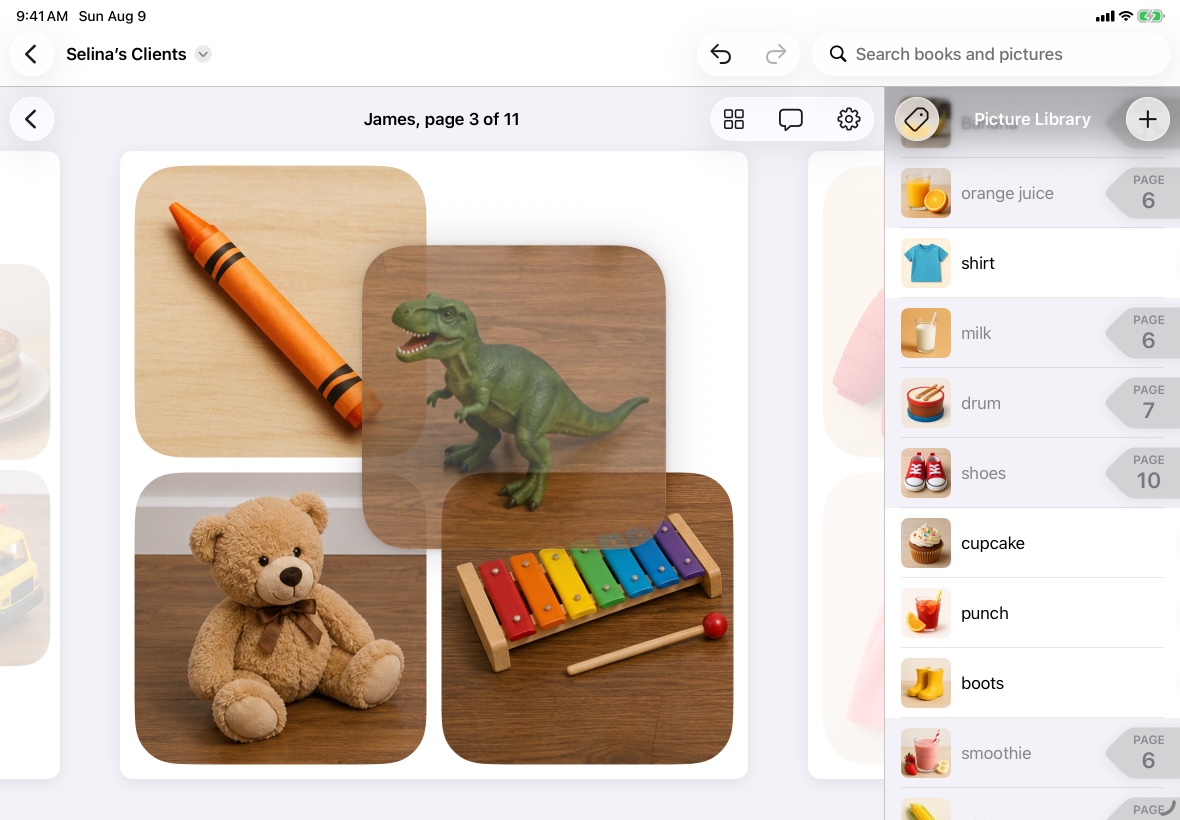
Arrange the buttons on a page
While in the single-page view, long-press a button and drag it to change where it appears on the page.
The layout of buttons is fixed and depends on the number of buttons you have added to the page. However, you can drag to change the order in which your buttons appear.
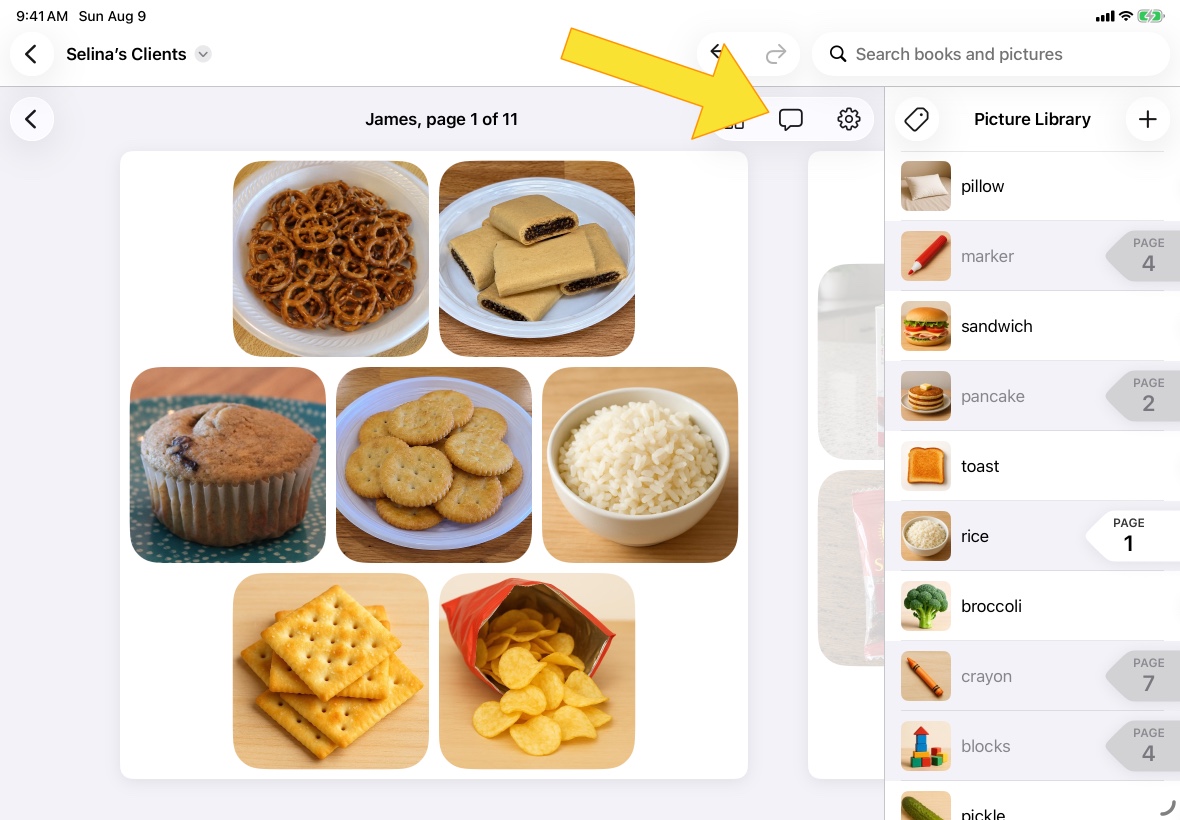
Set the voice for a Button Book
Tap the speech bubble button to open the Voice settings menu. From that menu, you may select the voice that speaks when buttons are tapped.
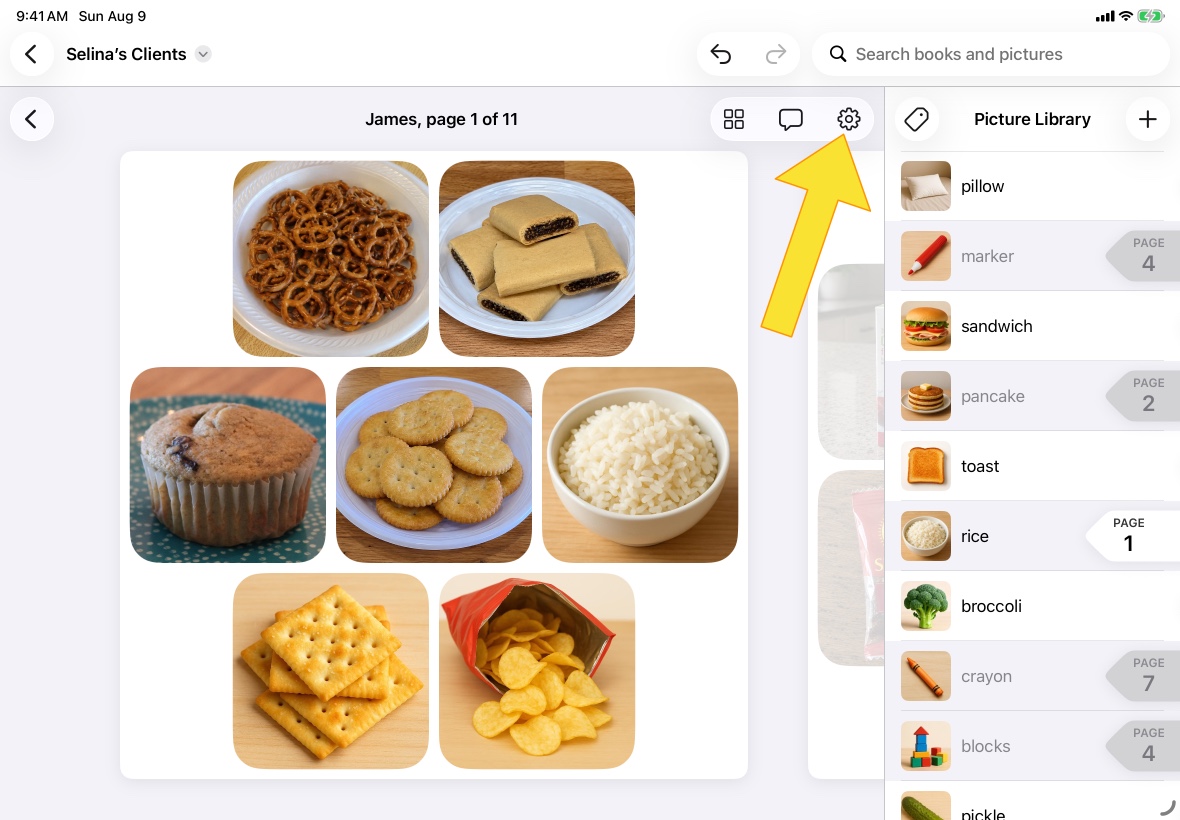
Other book settings
If you would prefer to be able to add the same button to multiple pages of your Button Book, you may enable the Allow duplicate pictures setting.
While this settings is enabled, page numbers will not be shown for pictures that have been added as buttons to your Button Book.
Purchasing Pick-a-Pic
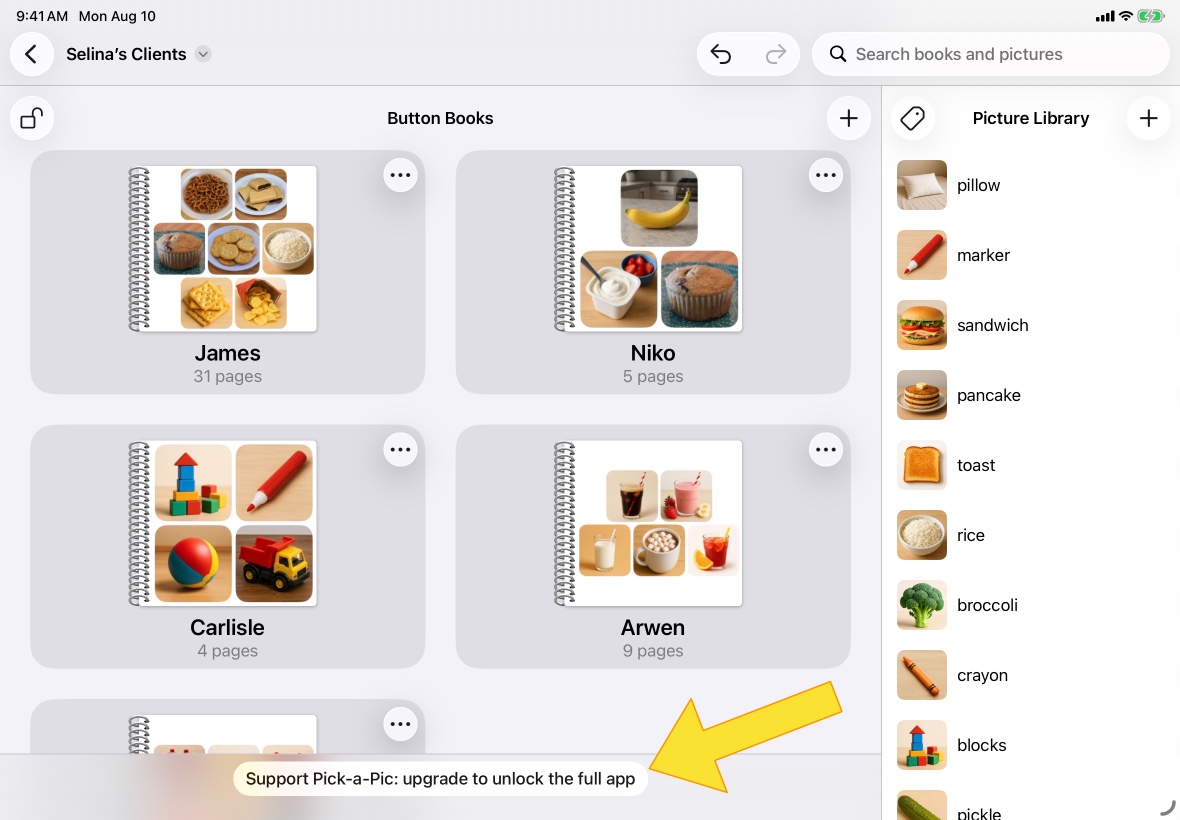
Unlock the full app
The free version of Pick-a-Pic has a limit of 20 pictures in your Picture Library.
To remove that limit, tap the Support Pick-a-Pic button at the bottom of the screen. If that button is not visible then you've already unlocked the full version.
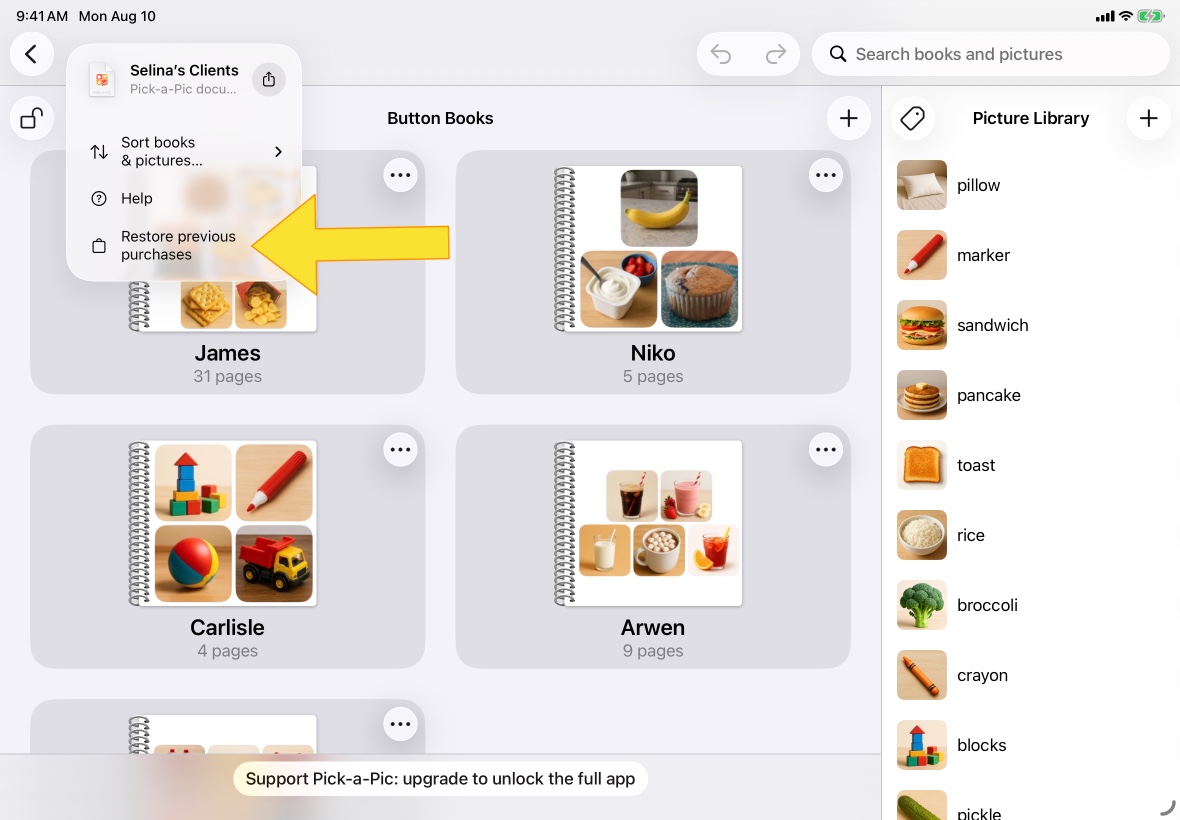
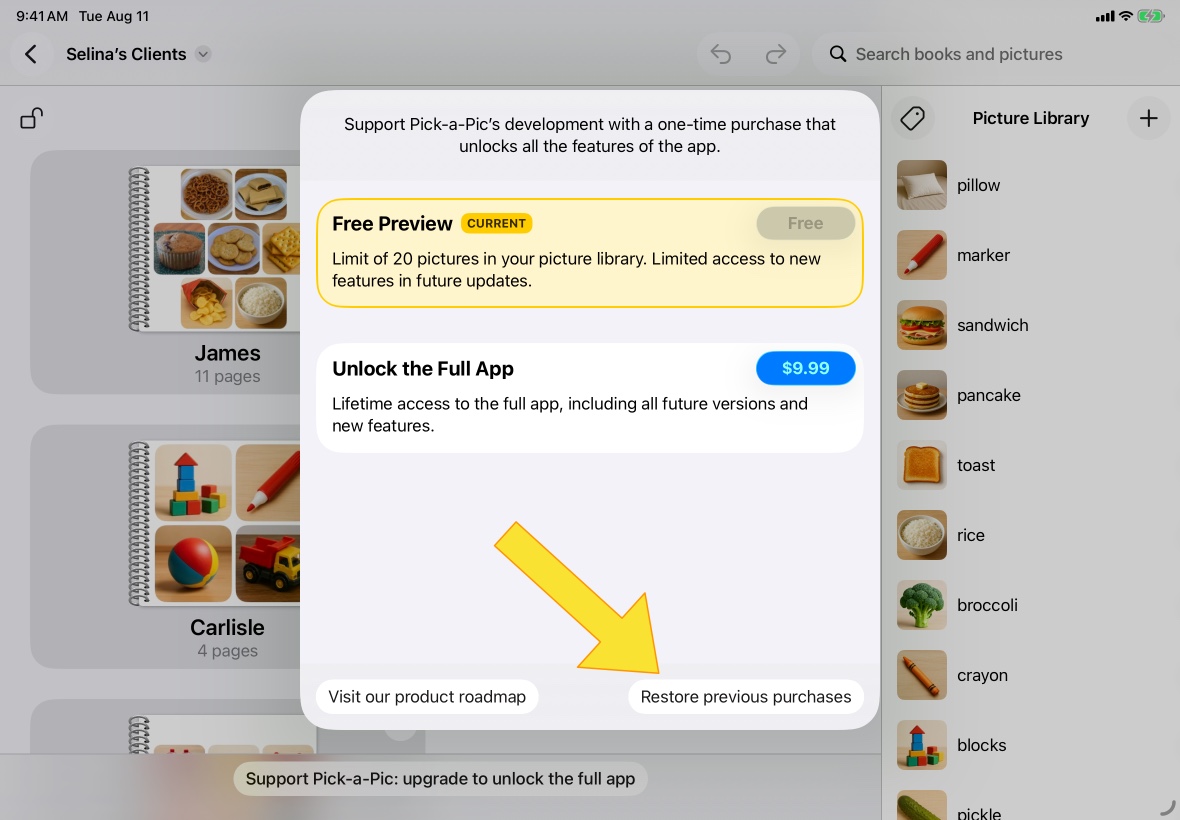
Restore your purchase
If you've already purchased Pick-a-Pic then there is no need to purchase it again. Instead, tap the name of the file and then tap the Restore previous purchases menu item.
The same button can also be found on the purchasing modal.
Support
For bug reports, feature requests, or other technical questions, please email James at james@pick-a-pic.app.
For questions about functional communication development, behavior analysis, or verbal behavior training, please email Selina at selina@pick-a-pic.app.
For all other inquiries, please email us at hello@pick-a-pic.app.